Integrating Amazon FBA with EasyEcom
By following the below-mentioned procedure you can easily integrate Amazon FBA with EasyEcom.
Step 1: On the dashboard, click on the “Three dots aka meatball menu”
Step 2: Click on the “Account Settings” option
Once you click on the meatball menu, you will see the following fly-out menu:
Here click on the “Account Settings” option.
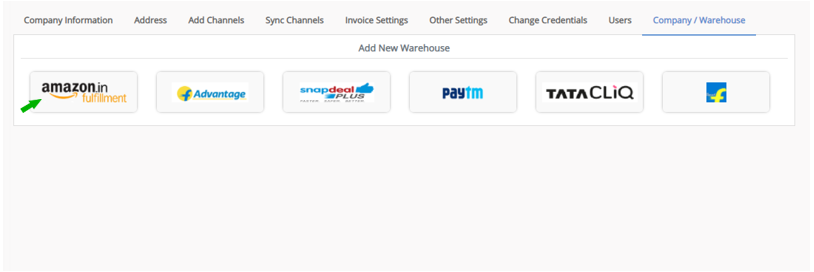
Step 3: Click on “Company/Warehouse”
Once you click on Account Settings you will be navigated to the following page:
Step 4: Select “amazon.in fulfillment”
In the Company/Warehouse page select “amazon.in fulfillment”.
Once you click on it this pop-up will appear:
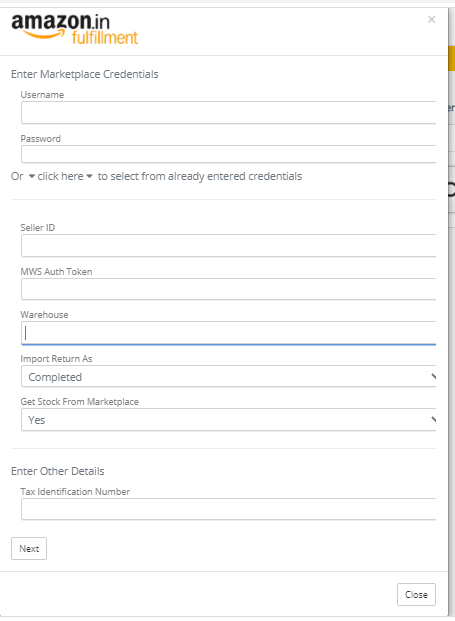
You are required to enter your Username, Password, Seller ID, MWS Auth Token and Tax Identification Number.
Select Import Return As as Completed or Pending based on its status.
If you want to “Get Stock From Marketplace” select option “Yes” otherwise select “No”.
You are required to enter your Username, Password, Seller ID, MWS Auth Token and Tax Identification Number.
Select Import Return As as Completed or Pending based on its status.
If you want to “Get Stock From Marketplace” select option “Yes” otherwise select “No”.
Step 5: For your MWS Auth Token and Seller ID
First login to Amazon seller central account and navigate to “Settings>>User Permission”.
Here under Apps and Service option select “Manage your Apps” option.
Then click on the "Authorise new developer" button.
Now enter “EasyEcom” in the Developer’s Name column, and in the Developer ID column enter “1683-6824-8081”
Select all the check-boxes and click on the “Next” button.
Now copy the Seller ID and MWS Auth Token and paste in the “amazon fulfillment” pop-up.
Step 6: For Warehouse ID
In the Amazon seller central account and navigate to “Settings>>Fulfillment by Amazon”.
Now click on the “edit option” and copy the Warehouse ID information.
Step 6: Enter “Billing Address” and “Shipping Address”
Once you have entered all the information in the amazon fulfillment pop-up click on the “Next” button.
Then click on the “Save” button.
You have now successfully added Amazon fulfillment in your EasyEcom warehouses.
Return Management
Related Articles
Integrating Amazon Multi-Channel Fulfillment (MCF) with EasyEcom
To integrate your Amazon Multi-Channel Fulfillment (MCF) account with EasyEcom please follow the below-mentioned process. Step 1: On the dashboard, click on the “Three dots aka meatball menu” Step 2: Click on the “Account Settings” option Once you ...Integrating Amazon European Marketplaces with EasyEcom
We provide the following Amazon marketplace integrations in European region: Amazon United Arab Emirates Amazon Germany Amazon Egypt Amazon Spain Amazon France Amazon UK Amazon India Amazon Italy Amazon Netherlands Amazon Saudi Arabia Amazon Sweden ...Integrating Amazon.com, amazon.com.mx, and amazon.ca. with EasyEcom
Users can very easily integrate their Amazon account with EasyEcom by following the below-mentioned procedure. Step 1: On the dashboard, click on the “Three dots aka meatball menu” Step 2: Click on the “Account Settings” option Once you click on the ...Integrating Amazon India with EasyEcom
Users can very easily integrate their Amazon account with EasyEcom by following the below-mentioned procedure. Step 1: On the dashboard, click on the “Three dots aka meatball menu” Step 2: Click on the “Account Settings” option Once you click on the ...Integrating Amazon Retail B2B with EasyEcom
Prerequisites Customer Master must be configured before enabling this integration. Marketplace Warehouse Code must be mapped per customer This mapping is used to identify the customer from incoming POs If this mapping is missing: Purchase Orders will ...