Managing PII Access in EasyEcom
Who Should Read This?
Use this article if:
- Customer name, phone number, or address is not visible inside an order.
- You want to control which users can see customer contact details.
- You need to allow or restrict access to customer personal information.
This setup controls that visibility.
What is PII?
PII (Personally Identifiable Information) refers to customer personal details shown inside EasyEcom, such as:
- Customer Name
- Mobile Number
- Email ID
- Shipping Address
Customer personal details are hidden by default to keep data secure.
Who Can Grant PII Access?
Only a Super Admin can:
- Access PII Settings.
- Enable or disable PII access for other users.
- Control access separately for UI and Reports.
Are You a Super Admin?
If NO:
- Contact your account’s Super Admin.
- Or raise a request to EasyEcom Support to assign Super Admin access.
If YES:
- Continue with the steps below.
Only a Super Admin can enable or disable PII access for other users.
Step 1: Request Super Admin Access (if Required)
If no Super Admin exists in your account:
Contact EasyEcom Support and provide:
- Account Name
- Registered Email ID
- User Email ID to be made Super Admin
- Business justification
Support will enable Super Admin access after verification.
Once approved:
- Log out and log in again for changes to reflect.
Step 2: Enable Two-Factor Authentication (Mandatory)
Before accessing PII Settings, 2FA must be enabled
What is 2FA?
2FA (Two-Factor Authentication) adds an extra security step during login.
Instead of only entering:
- Email
- Password
You must also enter:
- A 6-digit code generated from a mobile app (known as Authenticator)
This ensures only approved users can see customer details
How to Enable 2FA
Navigation
- Login to EasyEcom.
- Click Settings (top right corner).
- Under Settings, Click on Change Credentials
- Click on Activate 2FA (if not activated yet)
- Click Activate 2FA
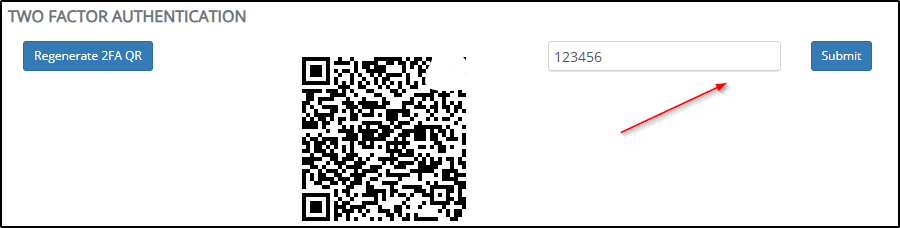
After You Click “Activate 2FA”
The screen will show:
- A QR code
- A box to enter a 6-digit code
Now choose one of the options below depending on the app you install
Option A: Setup Using Google Authenticator
Step 1: Install the App
On your mobile:
- Open Play Store (Android) or App Store (iPhone)
- Search for Google Authenticator
- Install the app
Step 2: Add Account in Google Authenticator
- Open Google Authenticator.
- Tap + (Add a code) & Scan a QR code.
- Allow camera permission (if prompted).
- Scan the QR code shown on EasyEcom screen (as shown Above)
After scanning:
- A 6-digit code will appear.
- The code refreshes automatically every ~30 seconds.
Step 3: Enter Code in EasyEcom
- Enter the 6-digit code in the box on EasyEcom.
- Click Submit.
2FA is now activated.
Option B: Setup Using Microsoft Authenticator
Step 1: Install the App
On your mobile:
- Open Play Store (Android) or App Store (iPhone)
- Search for Microsoft Authenticator
- Install the app
Step 2: Connect Your Mobile to EasyEcom
- Open the Authenticator app.
- Select Scan QR Code.
- Allow camera permission (if prompted).
- Scan the QR code shown on EasyEcom screen.
You do not need to type anything manually.
After scanning:
- A 6-digit verification code will appear.
- The code refreshes automatically every ~30 seconds.
Step 3: Enter Code in EasyEcom
- Enter the 6-digit code in EasyEcom.
- Click Submit.
2FA is now activated.
When Is 2FA Actually Activated?
Scanning the QR code alone does NOT activate 2FA.
2FA becomes active only after:
- You enter the 6-digit code in EasyEcom.
- You click Submit.
- You see confirmation that 2FA is enabled.
If you scanned the QR but did not click Submit:
- 2FA is not activated.
- You may delete that entry from the Authenticator app and restart the setup if needed.
What Will Happen During Login?
After enabling 2FA, when logging in on Easyecom:
- Enter Email + Password.
- System asks for a 6 digit code.
- Open your Authenticator app and enter the number shown
OR
- Click Submit.
Step 3: Access PII Settings (Super Admin Only)
After:
- Super Admin access is granted
- 2FA is enabled
A new option appears under Settings:
PII Settings
PII Settings
Only Super Admin users can see this option.
If the option is not visible:
- Ensure you are logged in as Super Admin.
- Ensure 2FA is enabled.
- Log out and log in again.
PII Settings Page
On this page:
- All users are listed
- Users are shown location-wise (if multiple warehouses exist).
- Two access controls available per user:
- PII Access – UI
- PII Access – Reports
What Each Option Means
1. PII Access – UI
If enabled:
- User can view customer personal details on:
- Order Details Page
2. PII Access – Reports
If enabled:
- Customer PII will appear in:
- Sales Reports
How to Enable or Disable PII Access
- On this page, Locate the required user.
- Turn ON the toggle to grant access.
- Turn OFF the toggle to remove access.
Changes apply immediately.
Users may need to refresh the page or log in again to see updated visibility.
Important Notes
- 2FA must remain enabled for Super Admin users.
- Deleting or removing the EasyEcom entry from the Authenticator app does NOT disable 2FA in EasyEcom.
- If the Authenticator entry is deleted or lost, login will not be possible.
- Only EasyEcom Support can reset 2FA after verification.
- The 6-digit code is not sent via SMS or email. It appears only inside the Authenticator app.
- If the code changes before submission, enter the new number shown.
- EasyEcom does not automatically grant PII access to new users.
- PII access should be granted only when required.
- Super Admin rights should be restricted to limited users.
- Super Admin can modify PII access at any time.
- Review PII access periodically.
Complete Process Summary
- Ensure Super Admin access.
- Enable 2FA.
- Log in using Authenticator code.
- Open PII Settings.
- Grant or revoke PII access per user.
Related Articles
How does EasyEcom work?
As soon as you sign-up your account with EasyEcom and Integrate all your channels you will be amazed to see how EasyEcom can make your operations very much simple and stressless. It helps you to perform activities related to the Order process, Stock ...Integrating EasyGSP with EasyEcom
Overview EasyGSP cannot be integrated directly from EasyEcom. To integrate EasyGSP, contact the EasyEcom team. Once access is provided, configure EasyGSP from: Settings > Add Channels > EasyGSP EasyGSP access is provided separately for each location.Integrating Shopee with EasyEcom
This guide explains how to connect your Shopee store with EasyEcom using the Shopee authorization flow. Prerequisites A valid Shopee seller account. Access to the Shopee account or merchant account that needs to be connected with EasyEcom. Step 1: ...What is EasyEcom and who should use it?
EasyEcom is an AI-driven powerful tool that assists users to list, manage their products across multiple e-commerce platforms, in turn, providing oneself with a single interface to control their Inventory flow across all portals and manage orders ...How to go Live on EasyEcom?
If you are starting with your EasyEcom account for the first time, click here (after going through this onboarding guide) to start your onboarding process. There are 4 easy steps to go Live on the EasyEcom dashboard. Step 1: Select your marketplace ...