HHT - Start inwarding items - GRN
Software Plan: Growth & Enterprise
Account Type: Seller Account & Aggregator 3PL
Inventory Type: Serialised & Non-Serialised
Feature Description
GRN is recorded against purchase orders. To know more about how to create purchase orders, refer to the article 'Creating Purchase Orders.
To know how to create a GRN through the web, refer to the article "Create Goods Receiving Note - GRN"
You can create a GRN using both the web and Android. In this article, we will discuss how to use Android to create and record items in GRN.
Workflow
For Non-Serialised Accounts
STEP 1: Go to the Android app and click on GRN
STEP 2: All the approved POs are visible in the Purchase Order section.
You can view the total quantity of goods received and the pending quantity here for all Purchase Orders.
To view or create a GRN against a PO, click on the card.
STEP 3: Click on “GO TO GRN” to go to the GRN page.
For your reference, you can view the GRNs already recorded against this PO before creating a new GRN.
Existing GRNs:
STEP 4: Click on "New GRN" to create a new GRN and enter the Supplier Invoice ID and date.
You can now add inventory items to the new GRN created.
Note: If required, you can also add inventory items to existing GRNs.
STEP 5: You can now either scan the product’s Serial (Serialised Accounts)/EAN, UoM, QR Code or enter the SKU code.
STEP 6: Record the total units received that meet your quality standards as “Good Items” and the total units received that don’t meet your quality standards as “Bad Items”.
There are two modes:
1. In bulk mode, you can scan one item and enter the corresponding quantity in bulk
2. In single mode, you have to scan each item and categorise whether it's good or bad. Then click "Next".
STEP 7: Then, mention the batch code, product price and any additional cost (optional) and save the GRN.
In case of expiry-sensitive products, you need to mandatorily record the batch code. You also need to record both the manufacturing date and expiry date.
Slide right to save the details.
For Serialised Accounts
Step 1: Go to the Android app and click on GRN
Step 2: All the approved POs are visible in the Purchase Order section.
You can view the total quantity of goods received and the pending quantity here for all Purchase Orders.
To view or create a GRN against a PO, click on the card.

Note: For USN Type 1 & 3, the Direct GRN option is currently not available to use. We will provide an update on it soon.
For USN Type 2 & 4-
For USN Type 5 - Auto GRN is available.
STEP 3: Click on “GO TO GRN” to go to the GRN page.
For your reference, you can view the GRNs already recorded against this PO before creating a new GRN.
Existing GRNs:
STEP 4: Click on "New GRN" to create a new GRN and enter the Supplier Invoice ID and date.
You can now add inventory items to the new GRN created.
Note: If required, you can also add inventory items to existing GRNs.
Step 5: At this stage, the screen you see will depend on whether the below-mentioned setting is enabled in your system.

"SorteddataatGRN":1
The setting controls when you decide whether an item is good or bad during the GRN process.
Please contact the Easyecom Support Team to enable this setting.
If Enabled:
You will first see a screen asking you to select between Good Items and Bad Items. This allows you to sort items by their condition upfront, before scanning.
Select Good Items to scan all the good SKU/EAN or quantities at once.
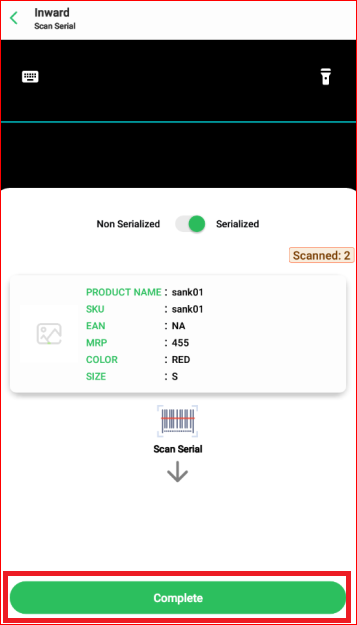
Scan the Serial/Serials
Step 6: Once the serials are scanned, click complete.
In case of Bad Items, you can return to the below screen and select Bad Items to scan the bad serials separately.
If the below-mentioned setting is enabled in the system, it will allow you to perform the QC while inwarding the items.
"enableGrnQcFailSerial":1,
The setting allows the users to perform QC during GRN.
Please contact the Easyecom Support Team to enable this setting.
Step 6: After selecting the QC Fail reason, slide right to GRN item.
and follow Step 7 mentioned below.
If Disabled:
You will be taken directly to the Inward Scan SKU/EAN screen.
You’ll scan each SKU first, and then choose whether it’s a Good or Bad item after each scan.
After scanning the Serial/Serials, click "Next".
In Case of Bad Items, If the below-mentioned setting is enabled in the system, it will allow you to perform the QC while inwarding the items.
"enableGrnQcFailSerial":1,
The setting allows the users to perform QC during GRN.
Please contact the Easyecom Support Team to enable this setting.
and follow Step 7 mentioned below.
Step 7: In case of expiry-sensitive products, you need to mandatorily record the batch code. You also need to record both the manufacturing date and expiry date.
Slide right to save the details.
Other Related Articles
Related Articles
HHT- GRN Process for UoM
Software Plan : Growth & Enterprise Account Type : Seller Account & Aggregator 3PL Inventory Type : Serialized & Non-Serialized Feature Description GRN is recorded against purchase orders. To know more about how to create purchase orders, refer to ...HHT : Auto GRN (GRN without PO)
Software Plan: Growth & Enterprise Account Type: Seller Account, Aggregator, 3PL Inventory Type: Serialized Feature Description Auto GRN is a type of Goods Receipt Note (GRN) that is created without a Purchase Order (PO). Unlike the standard GRN ...Movable Bin GRN Process (USN Type 5)
Software Plan: Growth & Enterprise Account Type: Seller Account & 3PL Inventory Type: Serialized Overview Movable Bin is used in GRN where items are scanned directly into a bin during inward, and the same bin is used until putaway is completed. ...Create Goods Receiving Note - GRN
Software Plan: Growth & Enterprise Account Type: Seller Account, Aggregator, 3PL Inventory Type: Serialized & Non- Serialized Feature Description A Goods Receiving Note (GRN) is an internal document produced by the warehouse team after inspecting the ...QR Code Scanning on GRN page
Software Plan: Growth & Enterprise Account Type: Seller Account & Aggregator 3PL Inventory Type: Non-Serialized Feature Description Easyecom now features QR code scanning on the GRN (Goods Receiving Note) page as well as in HHT. This new feature ...