Creating In-House Inventory Adjustment - Status to Status Transfer
Software Plan : Growth & Enterprise
Account Type : Seller Account, Aggregator, 3PL
Inventory Type : Serialized & Non-Serialized (UoM Supported)
Overview
Use this to change the status of inventory without changing its bin.
When to Use This Feature
Use when the status in the system does not match the actual condition of the stock:
- QC completed but status needs correction
- Damage found during handling
- Status mismatch during audit or stock check
- Stock needs to be blocked or released
- Inventory is not usable (expired / broken / discard cases)
- Internal usage tracking (repair, consumption)
When NOT to Use
- To move inventory between bins → Refer Bin-to-Bin Transfer
- For outbound movement → use order / RTV flows
- For quantity correction → use relevant adjustment
Prerequisites
- Inventory must exist in the selected Old Status
Workflow
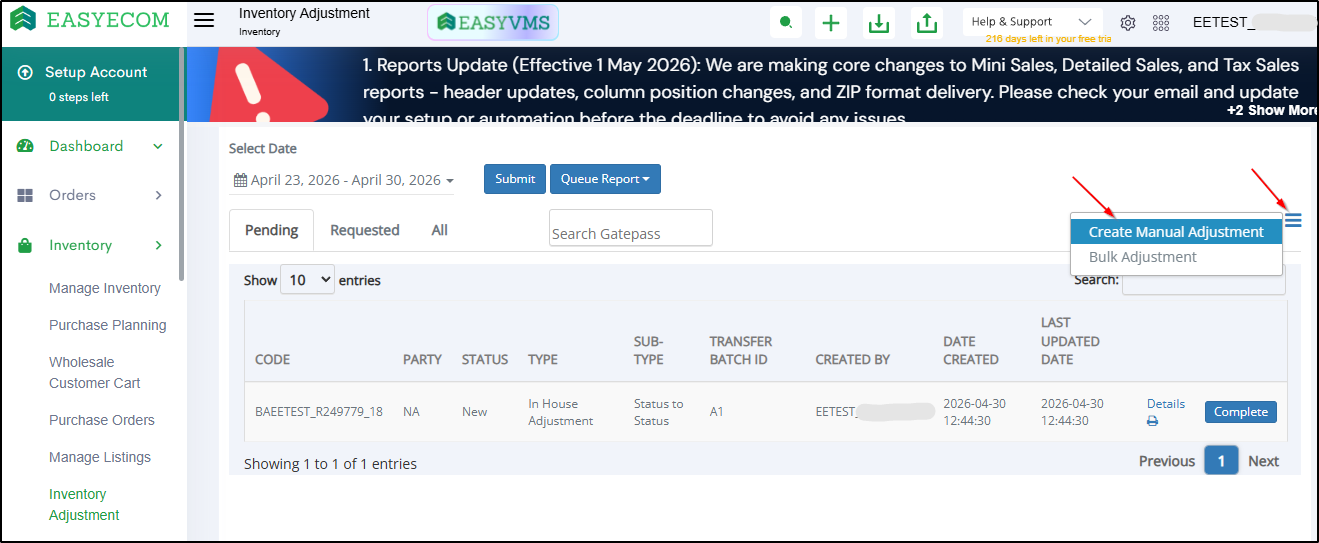
Step 1: Open Inventory Adjustment
- Go to Inventory → Inventory Adjustment
- Select required date range
Step 2: Create Manual Adjustment
- Click hamburger icon (≡)
- Select Create Manual Adjustment
Step 3: Select Type
- Type: In-House Adjustment
- Transfer Type: Status to Status Transfe
- Transfer Batch Id (Optional)
- Click Save
- A Batch for this inventory adjustment will be created.
Step 4: Add Product Details
- Click on Details against the created adjustment batch.
Step 5: Enter Inventory Details
Serialized
- Scan / enter Serial Number
- System auto-fills Old Status & Bin
- Enter New Status & Press Enter
- An option to download Batch Details CSV is available as well.
Non-Serialized
- Enter SKU / EAN / UOM
- Select Old Status
- Select New Status
- Enter quantity & Press Enter
Common
- Press Enter to add each line
Step 6: Complete
- Click Complete once all product details have been added
Bulk Adjustment
Steps
- Go Inventory > Inventory Adjustment > Click on Hamburger Menu
- Select Bulk Adjustment
- Choose:
- In-House Adjustment
- Status to Status Transfer
- Download template
- Fill:
- SKU / EAN
- Old Status
- New Status
- Old Bin (as per template)
- Quantity
- Upload and submit.
- Check View Imports to confirm upload status
Notes
- New Bin not used
- Adjustment PDF also includes Batch Code
- Errors may occur due to invalid values or format issues
Reports
- Go to Inventory → Inventory Adjustment
- Select date range
- Queue Report
- Download from View Exports
Batch-level details can also be downloaded from:
Inventory Adjustment → Details → Download Batch Details CSV
Rules
- Quantity cannot exceed available quantity
- Batch must be completed
- Completed batch cannot be edited
FAQs
Q1. Where to verify status-wise inventory?
Inventory → Manage Inventory → View Details
Q2. Why is my report not downloading immediately?
Reports are queued. Download from Exports after completion
Q3. Can this be reversed?
No. Create a new adjustment
Related Articles
Related Articles
Delta Inventory Adjustment in Easyecom
Software Plan: Growth Account Type: Seller Account Inventory Type: Serialized & Non-Serialized Feature description The Delta Inventory Update feature enables users to increase or decrease their inventory counts on any specific marketplace without ...Steps to do Returnable Inventory Adjustment for an SKU
Step 1: Go to Inventory > Inventory Adjustment > Create Manual Adjustment (Hamburger Menu on Top Right) Step 2: Select Type as 'Returnable' and Select Party 'Vendor' & Save The created entry will be visible. Step 3: Click on 'Details' to add ...Creating In-House Adjustment - Bin to Bin Transfer
Software Plan : Growth & Enterprise Account Type : Seller Account & Aggregator 3PL Inventory Type : Serialized & Non-Serialized Feature Description The In‑House Adjustment feature enables users to seamlessly relocate inventory from one bin to another ...Creating STN order in Easyecom
Software Plan: Growth & Enterprise Account Type: Seller Account Inventory Type: Serialized & Non Serialized Feature description A stock transfer note is created to authorise the movement of inventory from one location to another different location. ...Customer Level Inventory Blocking
Software Plan : Growth & Enterprise Account Type : Seller Account Inventory Type : Serialised & Non-Serialized Feature description This feature empowers sellers to block specific inventory, reserving it exclusively for valuable B2B clients, specific ...