How to create a Shelf/Bin in EasyEcom
Categorizing stock in bins or shelves is an important part of warehouse management, which helps retailers like you with an efficient pick-pack-ship process.
In EasyEcom, you can inward your inventory and place it in multiple bins/shelves, and easily manage your inventory stock. There are two methods to create a shelf:
Create an individual bin/shelf
Create them in bulk
This article talks about the steps to create a Shelf using both methods.
Step 1: In the toggle menu, navigate to “Masters>>Bins Master”
Step 2: Click on the “Hamburger Menu: ”
Once you are navigated to the Bins Master webpage click on the hamburger menu.
If you want to create a single shelf please click on the “Create New Shelf” option. If you want to create shelves in bulk click on the “Bulk Create Shelf” option.
If you choose “Create New Shelf” option
If you click on “Create New Shelf” option the following pop-up will appear:
Here write the Shelf Name, its length, breadth, and height.
Then click on the “Save” button and close the pop-up.
If you choose “Bulk Create Shelf” option
If you click on Bulk Create Shelf the following pop-up will appear:
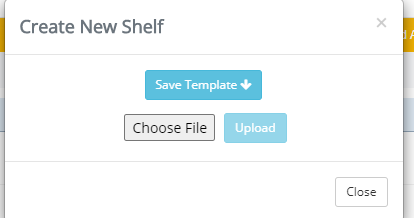
First, click on the “Save Template” button.
Once you click on it “createShelfTemplate” excel file will be downloaded in your system.
In this excel file write your Shelf names.
Then click on the “Choose File” option to select this file from your system and then upload it by clicking on the “Upload” button.
You have now successfully created a shelf in EasyEcom.
Related Articles
Bins Master - Zones, Bins & Tote Configuration
The Bins Master is a critical component that allows you to efficiently organize, track, and manage inventory items within physical storage locations. This document serves as a guide to understanding and utilizing the features and functionalities of ...Mapping Warehouse Bins with SKU
Software Plan: Starter, Growth & Enterprise Account Type: Seller Account, Aggregator & 3PL Inventory Type: Serialized & Non-Serialized Feature description When a specific SKU has been pre-mapped to a particular bin location within the system, the ...Performing Cycle Count for your warehouse
Software Plan: Growth & Enterprise Account Type: Seller Account Inventory Type: Serialised & Non-Serialised Feature Description Cycle count is the process of tallying the physical inventory and the software inventory. Cycle Counts can quickly ...Create Goods Receiving Note - GRN
Software Plan: Growth & Enterprise Account Type: Seller Account, Aggregator, 3PL Inventory Type: Serialized & Non- Serialized Feature Description A Goods Receiving Note (GRN) is an internal document produced by the warehouse team after inspecting the ...Bin Suggestion for PutAway
Put away bin suggestion functionality aids in the efficient organization of inventory by suggesting the ideal location (bin) to store returned and canceled SKUs/items/products received in the warehouse. How does the Putaway bin suggestion work? 1) ...