B2B Order Processing (New)
Overview
Use Case
For Handover
A default setting will be enabled "shipTogether":"2"
This setting will allow the user to scan the consignment and then boxes one by one in the handover.
"box_scan_at_handover":1
For Packing slip
"b2bPicklist":1
Workflow
Video - Order Creation & Approval (Step 1-5)
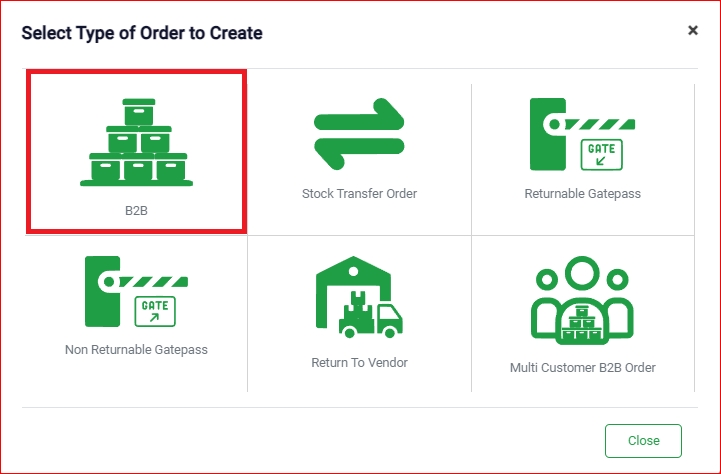
Step 1- Create Order

OR
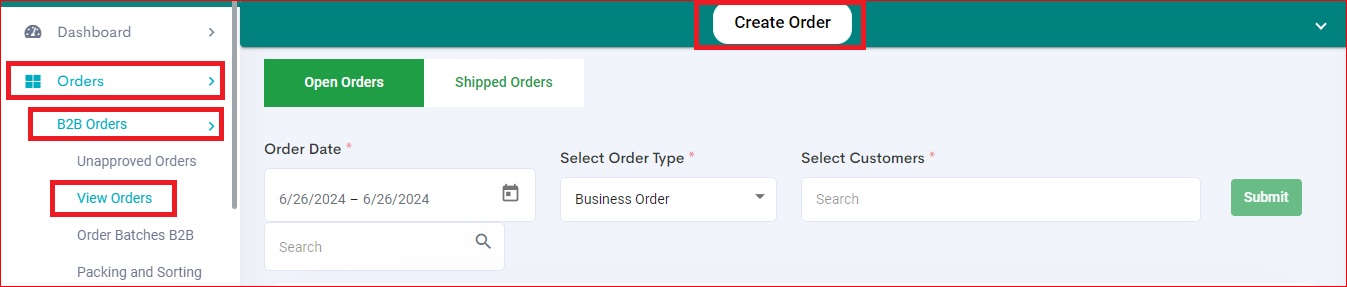
Step 2- Choose the Order Type as “B2B”
Step 3- Add Customer Details
Step 4- Fill in the required column to create an order
Appointment Date- The exact date by which the goods must be delivered.
Earlier than the appointment – they might refuse or return the shipment.
Later than the appointment – they might not accept the order or penalize the seller.
- The new Pricing Master is not supported for international customers. Therefore, the Calculate Price from Pricing Master option is not displayed for international customers.
- New B2B does not support Combo Products.
- If Lite Kitting is enabled, users can create and process Lite Kits (Physical Kit or Virtual Kit) as per the Lite Kitting configuration.
Order Approval
After approval, the order is available under:
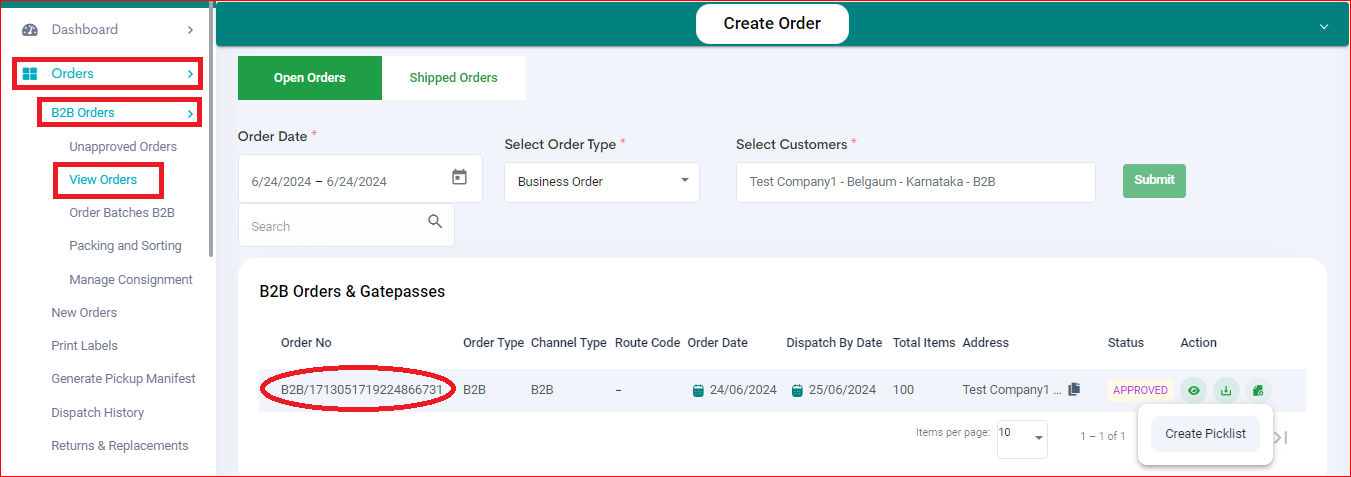
Orders > B2B Orders > View Orders → Open Orders
- If the full inventory is assigned, the order is moved to Assigned status and is ready for picklist creation.
- If only partial inventory is assigned, the order shows Partially Assigned and picklist cannot be created directly.
If you try to create a picklist in this case, the system shows a confirmation.
Once you proceed, the order is split into:
- assigned items (used for picklist)
- unassigned items (remain pending)
Go to:
Orders > B2B Orders > Unapproved Orders
All unapproved orders will be available here.
- Open the order using View Order
- Enter Confirm Quantity
- Click Approve Order
If you enter full quantity, the order is fully approved.
If you enter a lower quantity, the order is partially approved.
- Click Approve by Sheet
- Download the sheet
- Fill Confirm Quantity & Save the file/sheet
- Upload the sheet & Check Imports for confirmation of uploaded file
The approval runs in the background and can be checked in Imports.
Partial quantity approval is allowed based on the quantity entered.
Navigation:
Orders > B2B Orders > Unapproved Orders → Hamburger icon → Bulk Approve Orders
- Click on Bulk Approve Orders
Select orders using one of the following:
Option A: Enter Order IDs
- Enter Order IDs one per line
- Maximum 50 orders
- Click Download sheet (option on the right)
Option B: Use Filters
- Select order date
- Select Customer (or All)
- Click Download sheet (option on the right)
In both ways, a file with selected orders (entered or basis filters) is downloaded on the system.
- Open the file and enter ConfirmQuantity
- Quantity must match order quantity
- Partial quantity approval is not allowed
- Save the file
If error is found, download error file, correct and upload the original CSV file and upload again
- Maximum 50 orders per upload
- Order IDs must be entered line-wise
- Only full order approval is supported
- Use the downloaded file for upload
Orders > B2B Orders > View Orders → Open Orders
Step 5- Once the order is approved, to view the order details
Video - Order Search, Status, Picking & HHT Flow (Step 6-8)
SKU Swapping
- Allowed in order statuses:
- Approval Pending (Auto Assign Inventory OFF only)
- Assignment Pending (Auto Assign Inventory OFF only)
- Assigned
- Pending
- Not allowed once picklist is created or picking starts
- Swap is allowed at SKU level only
- Quantity cannot be changed
- Same invoice ID is retained
- Swapped SKU's hisotry is available under order's Notes
- If pricing is calculated from Pricing Master:
- New SKU must have pricing defined
- Swap is blocked if pricing is missing
- If pricing is not calculated from Pricing Master:
- New SKU uses the price provided during order creation
- Picklist contains only the updated SKU
- Old swapped SKU does not appear
Step 6- Go to Actions and click on Create Picklist

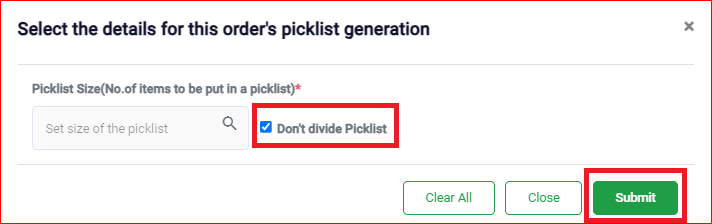
Step 7- Select Picklist Criteria

Step 8- Go to Order Batches B2B to view the batch.
You may also bulk download the picklists.
Video - Order Box Processing, Packing & Packaging Slip (Step 9-14)
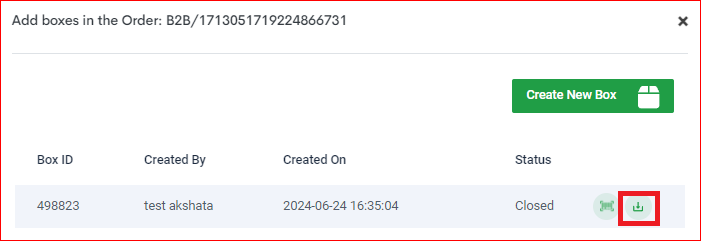
Step 9- Click on the Batch ID or Go to Packing and Sorting and scan the Picklist ID

Step 10- Once the picklist ID is scanned, you will get the option to Create Box
Step 11- The box will be created and you will receive the Box ID with the barcode.


Step 12- Scan the Box ID, then scan the SKU/EAN/SERIAL/UOM.


Once all the quantities are scanned, all the items will be packed. Click on OK
Step 13- Close the box.


On closing a box, the system automatically generates a Box Number for that box.
The Box Number starts from 1
Packing Material
Step 14- Packing Slip

Packing Slip Behaviour Based on Configuration
If "generate_packing_slip_after_invoice" = 0:• Packing slip is auto-downloaded immediately after box closure.• Box Number is printed below the Order Number at the time of packing.If "generate_packing_slip_after_invoice" = 1:• Packing slip can be downloaded only after invoice generation.• Box Number and Box Count are printed after invoice generation.• Box Number will not print on the packing slip before invoicing.
You may also generate the barcode of the box
Video - Invoicing & Handover (Step 15-23)
Step 15- Go to Start Invoicing
Or else, you can scan each box individually.
Step 16- Create Consignment

Step 17- Once the consignment is created, click on Action to start the invoicing
Step 18- Scan the Box ID
Scan the Box ID to add the box to the consignment.
If multi_box_scan_invoice is enabled, scan the first Box ID and click View All Boxes.
- The system displays all closed boxes associated with the order.
- Select the required boxes and click Add To Consignment.
- All selected closed boxes will be added to the consignment at once.
- Only closed boxes are available for invoicing.
- Boxes that are still open or have incomplete packing are not available for selection.
- One consignment batch can contain a maximum of 5000 boxes.
Remove Box from Consignment
- If a box is added incorrectly, click Remove Box and scan the Box ID again.
- A confirmation popup will appear.
- Select the checkbox and click Proceed.
- The selected box will be removed from the consignment.

Step 19- Generate Invoice
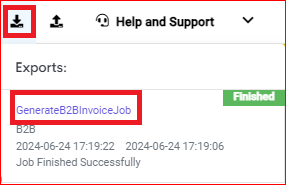
Downloaded Invoice
Step 20- Generate Packing Slip
 You may download the invoice or the consignment doc. Go to Actions and click on Downloads
Step 21- Create Manifest
Step 22- Scan Consignments
With shiptogether2 & box at handover enabled
Step 23- Add Shipping Info
Shipping Information
Once the consignment is added to the handover, shipping information must be updated before manifest generation.
Manual Shipping Information
Click Add Shipping Info and enter the required transportation details.
Save the details and proceed with manifest generation.
When ClickPost is Integrated
If ClickPost is integrated on the account, the Add Shipping Info option is replaced with Generate Shipment.
Users will see the following options:
- Generate Shipment (ClickPost)
- Generate Shipment (Manual)
Generate Shipment (ClickPost)
- Select this option to generate the shipment through ClickPost.
- Once the shipment is generated successfully, the button changes from Generate Shipment to Edit Shipping Info.
Users can then review or update the transportation details associated with the generated shipment before manifest generation.
Generate Shipment (Manual)
Select this option if shipment creation through ClickPost is not required and transportation details need to be entered manually.

- If the order invoice value is more than Rs 50,000, shipping information will be mandatory to give. If it is less than Rs 50,000, you may directly generate the manifest
Click on Generate Manifest
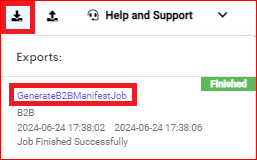
Downloaded Manifest

Auto Batch Closing
Scenario 3: When an order has both shipped and cancelled items, and the manifest is generated, the system will automatically close the batch.
In the above image, out of 20 suborder items, 5 suborder items are in "Manifested" stage and 15 suborder items are in cancelled. Hence, the system closed the batch automatically.
FAQs
Currently, there is no limit of line items/ SKUs in B2B Orders.
No, shipping information is only mandatory for orders above Rs 50,000. If your order value is less than Rs 50,000, you can proceed without providing shipping information and the manifest will be generated automatically.
No, the new pricing master is currently not applicable to international customers. Additionally, the "calculate price from pricing master" option will not be available for international orders.
Currently, adding combo products directly while creating an order is not supported in the new B2B system.
Other Related Articles
Related Articles
B2B Order Processing (New) Process + Speed Optimized Flow
Software Plan : Growth & Enterprise Account Type : Seller Account Inventory Type : Serialized & Non-Serialized Overview This article explains how to process B2B orders using Process + Speed Optimized Flow. In this flow: Invoicing is done from Order ...B2C Order Processing – Individual Orders
Software Plan : All Account Type : Seller Account & Aggregator 3PL Inventory Type : Serialised and Non-Serialized Description This article documents the end-to-end processing of individual B2C orders in Easyecom, starting from order availability in ...Integrating Amazon Bopis with EasyEcom
Users can very easily integrate their Amazon Bopis account with EasyEcom by following the below-mentioned procedure. Step 1: On the dashboard, click on the “Three dots aka meatball menu” Step 2: Click on the “Account Settings” option Once you click ...Order Routing to Different Warehouses
Software Plan: Growth & Enterprise Account Type: Seller Account Inventory Type: Serialized & Non-Serialized Overview Order Routing determines which warehouse location will process an incoming marketplace order. If you operate from multiple warehouse ...How does EasyEcom work?
As soon as you sign-up your account with EasyEcom and Integrate all your channels you will be amazed to see how EasyEcom can make your operations very much simple and stressless. It helps you to perform activities related to the Order process, Stock ...