Syncing Tally ERP 9/Prime SKU codes with EasyEcom
Once you integrate your Tally ERP/Prime account with EasyEcom, you no longer have to manage your accounting manually.
Once the integration is live, EasyEcom will automatically sync your Tally products, invoices, credit notes, and payments.
You can easily integrate your Tally ERP 9/Prime account with EasyEcom by following these steps.
Please follow the below-mentioned process to map your Tally ERP9 /Prime product’s SKU codes with the system.
Step 1: In the toggle menu, navigate to “Masters>>Product Master”
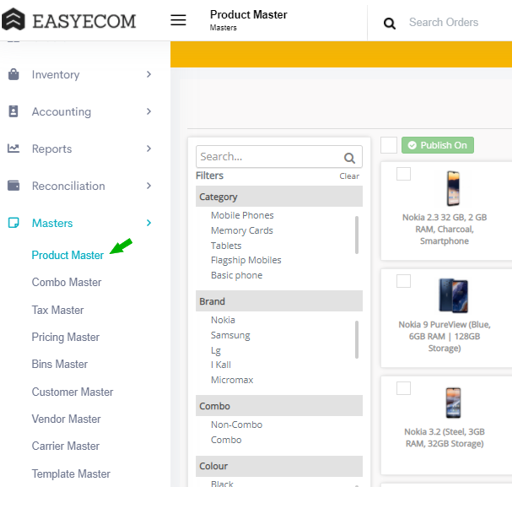
You can map Tally ERP 9/Prime’s SKU codes in the system one by one or in bulk.
Mapping SKU codes one by one
Step 1: Click on the “SKU code”
On the Product Master screen click on the SKU code that you want to map your Tally ERP9/ Prime’s product listing with.

Step 2: Enter necessary information
Once you click on it, you will be redirected to the Product Info page.

Here, enter your Tally ERP 9/ Prime’s SKU unit and code the “Accounting Unit” and “Accounting SKU” columns respectively.
Also, select the “Tax Rule” you want to apply to the product.
Then click on the “Update'' button.
You can apply tax rules on item-level and on category-level.
Please follow the process mentioned here, to set tax rules in the system.
Mapping SKU codes in bulk
Step 1: Download Product Attribute file
To map Tall ERP 9/Prime listings in bulk, first, download the product attribute file.
To download the file, click on the cloud icon.

Once you click on it you can download the Product List file from “Exports Job”.

Step 2: Update the necessary information
In this excel file, enter the “Accounting SKU”, “Accounting Unit” and Tax Rate of all your products.

Step 3: Upload the file to EasyEcom
To upload your file, first, click on the “Update Products” button.

Once you click on “Update Products” pop-up will be visible on your screen.

Click on the “Choose File” button and select the Product List file from your system. Then click on the “Submit” button.
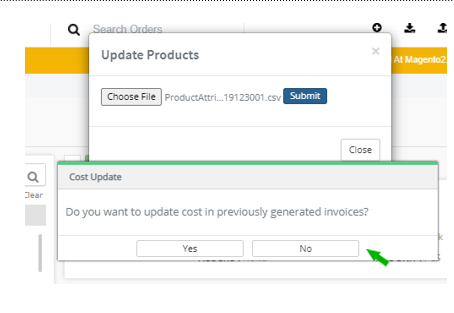
Once you click on “Submit”, the “Cost Update” pop-up will be visible on your screen.
Here click on the “No” option.
You have now successfully mapped your Tally product listing with EasyEcom.
The system will now automatically generate an invoice for all your orders and credit notes in case of sales return.
Please follow the process explained here to sync products, invoices, credit notes, and payments for your orders if you use the same payment mode across channels
Please follow the process explained here to sync products, invoices, credit notes, and payments for your offline orders if you use multiple payment modes across channels.
Related Articles
Syncing Marketplace Data from EasyEcom into Tally ERP 9/Prime
Once you integrate your Tally ERP 9/Prime account with EasyEcom, the system will sync your products listed on EasyEcom, sales invoices, credit notes, payments, and marketplace deduction fees across marketplaces into Tally ERP 9/Prime on a real-time ...How does EasyEcom work?
As soon as you sign-up your account with EasyEcom and Integrate all your channels you will be amazed to see how EasyEcom can make your operations very much simple and stressless. It helps you to perform activities related to the Order process, Stock ...How to Sync PO and GRN in Tally (Pre-requisites)
PO Sync Tally -> All the POs should be in approved status. -> Accounting Company Name in Easyecom should be the same as the company name in Tally. -> Purchase Ledger shown in tally should be set in Easyecom before syncing PO. Steps to set Purchase ...Syncing Tally ERP9/ Prime’s Products, Invoices, Credit Notes, and Payments for Online and Offline Orders from Multiple Payment Modes
To sync your Tally ERP9/ Prime’s data, you need to first map your Tally ERP9/ Prime’s listings with EasyEcom. In case, you have not mapped your Tally listing, please follow the process explained here. You can now sync your Tally ERP9/ Prime’s data ...Integrating your Tally ERP with EasyEcom
To integrate Tally ERP with EasyEcom, please ensure the following points- Accounting SKUs and Accounting Units must be updated in EasyEcom as well as in tally. The steps to update the Accounting SKU and Accounting unit are as follows- Masters > ...