Setting up taxation for your B2B and B2C Sales
Maintaining accounts for tax purpose is a difficult process for any organisation.
EasyEcom’s Tax Master makes this process easier for you by defining the tax rules which will be applicable for your product items.
You can define tax rules:
For all your product SKUs
Based on different prices charged.
In this article, the process of setting Tax Rules for Indian and non-Indian sellers is explained.
If you are an Indian seller please follow the below-mentioned steps to create Tax Settings for your orders.
Step 1: In the toggle menu, navigate to “Masters >> Tax Master”
Step 2: Create a Tax Rule
Once you click on Tax Master, the following page will appear:
Step 3: Define GST Tax Rule
Once you click on ‘Create New’, the following page will appear:
Note: In the Select Type field there are two options: "Sale Invoice" and "STN". Sale Invoice is applicable for both B2B and B2C transactions. Choose the option STN if you want to create a Tax Rule for your stock transfers.
Next, provide the “Rule Name”.
There may be different tax brackets that are applied based on the prices.
You can set these rates easily, enter your price ranges, and select the GST value from the drop-down option.
Once you set the GST value, the system will automatically set the required values in IGST, CGST, SGST and UTGST.
You can also easily fill in the CESS value in the “Enter Tax Value For CESS (in decimal)” column.
After this click on the “Set Tax Rule” button and then Submit it by clicking on the “SUBMIT” button.
Step 4: Define your Tax Rule for all Categories
In the column Tax Rule, please select your Tax rate for all the invoices from the drop-down option. In the column TAX RULE (STN) select that Tax Rule from the drop down option, which is applied in your business operations like logistics etc.
Once this process is complete, you can update your taxation for past orders also. Click here to know the process.
If you are not an Indian seller please follow the below-mentioned process.
Step 1: In the toggle menu, navigate to “Masters >> Tax Master”
Step 2: Click on the “Add New Class” button
On the Tax Master page click on the “Add New Class” button.
Step 3: Please provide the necessary details
Once you click on it, the following pop-up will appear:
Here enter your Class Name and Class Code. Note that this is only for your reference and will not be mentioned in the invoice.
If you want to apply compound tax, please select the “Has compound tax” option. In the Tax Lines column mention the tax type you want to apply and then fill in the Tax Percentage you want to apply. Note that the tax type mentioned in the “Tax Lines” column will be shown in the invoice.
You can also apply an increasing tax percentage with respect to your price.
For example, if the product price is between Rs 0-500 the tax percentage will be 15%, and if the price is above Rs.500, i.e Rs. 501 onwards it will be 20%.
Once you have provided all these details, click on the “Submit” button.
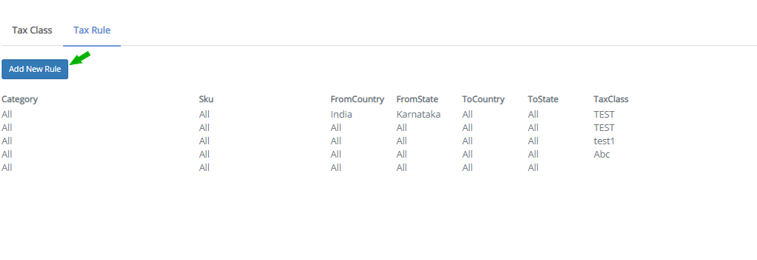
Step 4: Click on the “Add New Rule” button
On the Tax Master page, select “Tax Rule” and then click on the “Add New Rule” button.
Step 5: Please provide the necessary details
Once you click on the following pop-up will appear:
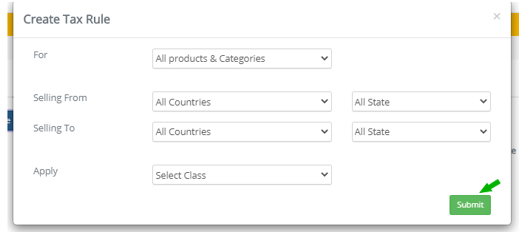
Here first select for what you are creating a Tax Rule from the drop-down option.
There are 3 options:
All products and categories
Select Categories
Select Products
Next please select the country and state you are selling from and selling to from the drop-down options.
Then apply the Tax Class from the “Select Class” drop-down option.
Finally, click on the “Submit” button.
You have now successfully created a tax setting for your orders.
Once you click on the following pop-up will appear:
Here first select for what you are creating a Tax Rule from the drop-down option.
There are 3 options:
All products and categories
Select Categories
Select Products
Next please select the country and state you are selling from and selling to from the drop-down options.
Then apply the Tax Class from the “Select Class” drop-down option.
Finally, click on the “Submit” button.
You have now successfully created a tax setting for your orders.
Related Articles
Setting up taxation for your B2B and B2C Sales (New Module)
Maintaining accounts for tax purposes is a difficult process for any organization. EasyEcom’s Tax Master makes this process easier for you by defining the tax rules which will be applicable for your product items. Tax can be set in EasyEcom HSN Wise ...Sales Channel Creation for B2B
Software Plan: Starter, Growth & Enterprise Account Type : Seller Account Inventory Type: Serialized & Non-Serialized Feature description This feature allows sellers to create distinct "Sales Channels" to categorize orders originating from various ...Customize Invoice Formats for Sales Orders
Users can very easily customize their invoice format for sales orders by following the below-mentioned procedure. Step 1: On the dashboard, click on the “Three dots aka meatball menu” Step 2: Click on the “Account Settings” option Once you click on ...PASSWORD LESS SIGN IN AND MULTI A/C LOGIN IN EASYECOM
We have now rolled out an option to sign in to EasyEcom without using your password via Google and Microsoft Authentication. WHAT IS PASSWORD LESS SIGN IN? - Password less authentication is a means to verify a user's identity, without using a ...Extracting Sales Data from EasyEcom
Step 1:- After logging in EasyEcom panel, kindly go to Dashboard → Sales details page. Step 2:- Select the criteria, if you want the data to be extracted on “Order date” or “Invoice date” basis. Step 3:- Select the warehouse and date range for which ...