Integrating Shiprocket WMS with EasyEcom
Location Software Plan : Starter
Account Type : Seller Account
Inventory Type : Non-Serialized
Feature description:
To enable the Shiprocket integration, The onboarding configuration will be completed at Shiprocket team's end,
They'll require the below details from your end for the integration:
They'll require the below details from your end for the integration:
- API user E-Mail
- Password
- location_key
The Email should be an API user in the EasyEcom account. Please follow the UserRole article for further steps.
Password will be the EasyEcom password for the above user's Email.
Location_key will be the seller token of the warehouse where the WMS is required to be integrated.
Please Note : The API User should be created in the Primary Account with below access for smooth functioning:
- PII access
- All location access
Adding EasyEcom as a Channel on Shiprocket WMS
1. After the SR account setup, Add EasyEcom
Channel on SR panel
2. Fill Communication Brand Name and Upload
Brand Logo
3. Add EasyEcom Credentials (Username and
Password) and Primary account location key (These
can be extracted from EasyEcom panel as mentioned in the earlier step)
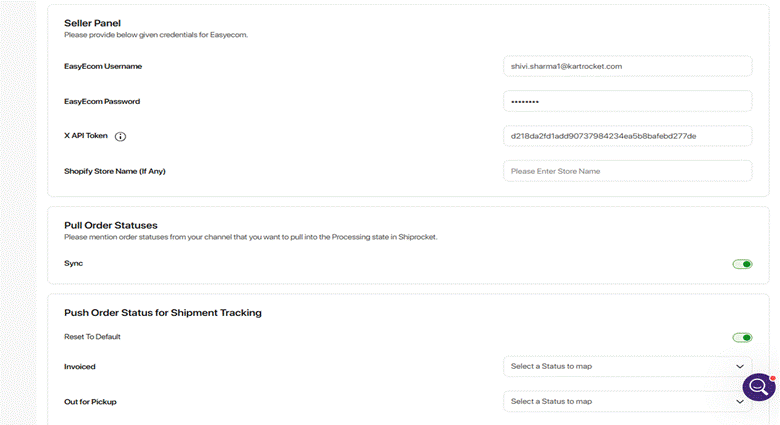
4. Enable ‘Pull Order Statuses’ and ‘Push
Order Status for Shipment Tracking’
5. Enable the services that will be used in
this Integration mentioned in the
Fulfillment Setup as per
Seller’s requirement
6. Sync the locations by clicking on Sync
Button and map the SRF locations with EasyEcom Locations, Enter Username,
Password for EasyEcom and click on Update Channel.
7. After Catalog Creation on SR, fetch the
listings from EasyEcom by clicking on Sync Icon on Top Right. If the product
codes on SR and Easyecom are alike, then they get auto-mapped.
If not, we need to map them by uploading a
file (the second icon on Top Right)
9. Click on Sync Icon on Shiprocket
Fulfillment Panel to enable Inventory Sync from Shiprocket to EasyEcom for the
first time
Required Settings for this feature to work :
Settings accessible from UI
- You are required to enable the Set Auto Dimensions setting at all locations for allowing the order processing
Account Settings>> Other settings>>Set Auto Dimensions for Multi Item Orders - The EasyEcom Store locations should be enabled with the below setting to ensure proper Inventory sync.
Account Settings>> Other settings>> Set "Method to update inventory in Manage inventory page" as "Update available quantity only"
Important Notes:
- The Routing will always be managed in EasyEcom, Any Order or Inventory management operation will be 1:1 managed between EasyEcom and SRF locations.
- Brands are required to Process any preexisting orders from Shopify and SRF and deactivate the SRF and Shopify configuration, the inability to do the same can cause order duplication issues and discrepancy,
Workflow
Below Touchpoints are currently integrated between Shiprocket and EasyEcom
| Product | The Products master in EasyEcom will be synced to Shiprocket WMS | EasyEcom |
| Sales Order data Fetch | New orders will be imported for warehouse rpocessing in Shiprocket WMS | EasyEcom |
Order Processing | Order confirmation and processing till Shipped | Shiprocket WMS |
Related Articles
Integrating DTDC Raftaar WMS with EasyEcom
Software Plan : Starter Account Type : Seller Account Inventory Type : Non-Serialized Feature Description This integration enables DTDC Raftaar WMS to connect with EasyEcom for managing order fulfillment. Once integrated: EasyEcom provides new orders ...Integrating Shiprocket-International with EasyEcom
By following the below-mentioned procedure you can easily integrate ShipRocket International with EasyEcom. Step 1: In the toggle menu, navigate to “Masters>>Carrier Master” Step 2: Click on the “Add New” button Once you click on Carrier Master you ...Integrating Holisol WMS with EasyEcom
Location Software Plan : Starter Account Type : Seller Account Inventory Type : Non-Serialized Important Points: Please Note the Holisol WMS integration requires additional development for Combo SKUs, hence its currently unsupported Feature ...Integrating Prozo WMS with EasyEcom
Location Software Plan : Growth Account Type : Seller Account Inventory Type : Non-Serialized Important Points: Please Note the Prozo WMS integration requires additional development for Return and Partial Cancellation Feature description: To enable ...Integrating Holisol WMS with EasyEcom
Location Software Plan : Starter Account Type : Seller Account Inventory Type : Non-Serialized Important Points: Please Note the Holisol WMS integration requires additional development for Combo SKUs, hence its currently unsupported Feature ...