Integrating Meesho-API with EasyEcom
Integrating Meesho with EasyEcom is a simple 5 step process for the user.
Step 1: On the dashboard, click on the “Three dots aka meatball menu”
Step 2: Click on the “Account Settings” option
Once you click on the meatball menu, you will see the following fly-out menu:
Here click on “Account Settings” option.
Step 3: Click on “Add Channels”
Once you click on Account Settings you will be navigated to the following page: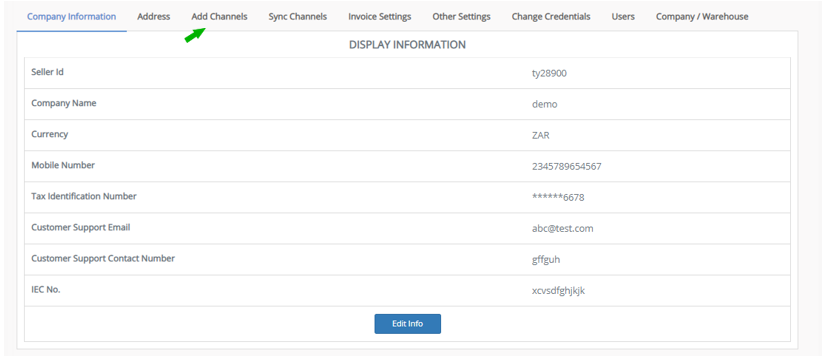
Here click on “Add Channels”.
Here click on “Add Channels”.
Step 4: Select Marketplace “Meesho-API”
Once you click on “Add Channels” you will be navigated to the following page:
Click on the “meesho” button.
Once you click on the “meesho” button the following pop-up will appear:
You are required to enter your Meesho Username in the above Field.
Once you have entered all the details in the pop-up click on the “Add Channel” button.
Important Notes :
- After Completing the Add channel procedure ( Essential ), Seller needs to Initiate the mail with the Meesho team to initiate the Client level Integration with EasyEcom over the given Mail-(meesholink-integration@meesho.com ).
- Mail Should consist of 2 Major Details i.e Meesho registered account Mail-Id and EasyEcom Unique Identifier as OMS unique identifier.
EasyEcom Unique identifier can be received from the channel settings, Please refer below screenshot for references: - Seller Order cancellation can only be done before the Confirmation of Orders in the New Orders Tab.
- Meesho's API is currently under development and the Invoice Amount Details aren't available as of now, Hence request you to please refer to the Meesho Panel for Tax and Sales order data.
- Once the supplier is integrated using the API Integration, The following Supplier actions on the Meesho Seller Panel will be Disabled-Supplier would not be able to Accept/ Manifest and Cancel orders.
- Seller vsku ids must be present on Meesho panel before hand to fetch the same as listings in EasyEcom.
- Incase of any issues please contact us at care@easyecom.io and Please reach out to integration@meesho.com for any cross-integration issues.
- Important Note: [Please Do not delete the Meesho-API Integration once you have Integrated the channel, This can cause Integration to be non-Functional and will require the Re-iteration of Steps no.1 &2 of the Integration]
- To Map the Packaging QR against an AWB please follow the below steps:Once the Label and Invoices has been generated;Click on the "Link Packet QR" button, as mentioned in the given screenshot:
The given screen will be displayed, here you are required to map your AWB number with the Meesho Packet QR code.
Note: If you enable the "Create Products Automatically" option, EasyEcom will automatically create a Master SKU of all your listed SKUs in Meesho. This is the easiest way to mirror the catalogue from Meesho to EasyEcom.
If you choose to not enable “Create Products Automatically”, you will have to upload the product master manually and map it with your Meesho listings.
You have now successfully integrated Meesho-API with EasyEcom.
List of Available Features :
Marketplace Product Catalog Import
Inventory Push
TAT- SLA display
Order Processing
Order Confirmation
Picklist Generation
Packing Slip Generation
Order Status Sync
Label Generation
Packaging QR
Manifest Generation
Order Customer Cancellation Sync
Returns Sync as a Pending Return.
Seller Cancellation before Order Confirmation.
Related Articles
Integrating Marketplace using EasyEcom Standard APIs
You can easily integrate your marketplace with EasyEcom by following the process explained in this video and/or the integration workflow document shared with you. Marketplace Integration Frequently Asked Questions 1. Do we need to add carrier ...Integrating Loqally with EasyEcom
This guide explains how to configure the Loqally integration in EasyEcom, and also supports reverse shipment. Step 1: Navigate to Carrier Master Masters > Carrier Master Step 2: Click on 'Add New' and Select 'Loqally Outbound' from the dropdown Step ...Integrating SharkShip Outbound with EasyEcom
This guide explains how to configure the SharkShip carrier integration in EasyEcom for shipment creation and shipment cancellation. Step 1: Navigate to Carrier Master Masters > Carrier Master Step 2: Click on 'Add New' and Select 'Sharkship Outbound' ...Integrating BoxD Logistics with EasyEcom
This guide explains how to configure the BoxD Logistics integration in EasyEcom, and also supports reverse shipment. Step 1: Navigate to Carrier Master Masters > Carrier Master Step 2: Click on 'Add New' and Select 'BoxD Logistics Outbound' from the ...Integrating Wishlink with EasyEcom
This guide explains how to integrate Wishlink Marketplace with EasyEcom to manage listings, inventory, orders, fulfillment, cancellations, and returns. Step 1: Click on the Settings (⚙️) icon in the top-right corner Step 2: Click on 'Add Channels' ...