HHT- Pick & Pack process for B2B orders

Software Plan : Starter, Growth & Enterprise
Account Type : Seller Account
Inventory Type : Serialized & Non-Serialized

Required Settings for this feature to work :
Settings to be enabled from the backend
1. is_b2b_new 1
This setting will enable the new B2B UI.
2. b2bPicklist 1
This setting will enable the new B2B UI.
2. b2bPicklist 1
This setting will enable the picking process from the HHT
3. pickPackB2B 1
This setting will enable the pickpack settings on HHT. Once this setting is enabled, picking & packing from the web will be disabled
Please contact the Easyecom Support Team to enable the above settings.
Workflow
Step 1: Create a B2B order.

Step 2: Once the order is approved, to view the order details, Go to Orders (main menu) > B2B Orders > View Orders
Scroll through the right and click on the Picklist Icon
Step 3: Click "Create Picklist".
Step 4: If you wish to divide the picklist into multiple picklists, keep the box unchecked and choose the zone to divide the picklist as per the zone and click on Submit

If you do not wish to divide the picklist, check the box and click on Submit.
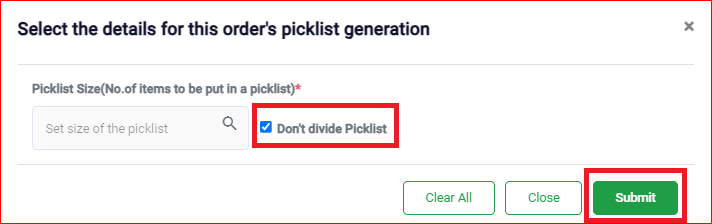
Incase of UoM inventory, user will not be able to select the size of the picklist
Step 5: Once the details are submitted, the order will automatically get added to the batch. Go to Order Batches B2B to view the batch.
Assign the Picker and the Packer.
Step 6: Open your Android app and select "Picklist".
Step 7: Choose the Picklist
Step 8: Choose "Create Box".
If UoM is enabled, click "Create UoM Box".
Step 9: Scan the Packing Material.
To learn how to create a Packing Material, please click here.Scanning of Packing Material depends upon the settings that are enabled by you in the "Other Settings Page". If this setting is enabled, you will be asked to scan the Packing Material.
Step 10: A box ID will be created. Scan the same box ID or manually mention it and click "Submit".
Step 11: Scan the bin/bin tag.
Step 12: Scan the SKU code/UoM code or manually mention it and click "Submit".
Step 13: Mention the quantity if bulk mode is enabled or scan the SKU code/UoM code one by one.
Step 14: Scan the bin/bin tag again.
Step 15: Click "Close Box".
Step 16: Mention the Dimensions of the box.
Box Dimensions depend upon the settings that are enabled by you in the "Other Settings Page".
- Do not ask for Box Dimension - The system will not ask to enter the box dimension
- Box Dimension (Mandatory) - The system requires the box dimension to proceed with further order processing
- Box Dimension (Ask during runtime) - The system will give a prompt to enter the dimensions however, it will be optional.
Step 17: The box ID status will be Closed.
Once all the boxes in the order are closed, you may go back to the web and complete the invoicing process.
Other Related Articles
Related Articles
HHT - Picklist & Short Picking Process
Picklist: You can view a single picklist for all the orders that are assigned to a batch, pick inventory items at your warehouse location and scan it. The app also helps you identify the remaining items that you need to pick to complete order ...Order Batches & Packing Station for B2C orders
Software Plan: Starter, Growth & Enterprise Account Type: Seller Account, Aggregator & 3PL Inventory Type: Serialized & Non-Serialized Feature Description The packing station is where the products are checked and packed before shipping. The station ...HHT- GRN Process for UoM
Software Plan : Growth & Enterprise Account Type : Seller Account & Aggregator 3PL Inventory Type : Serialized & Non-Serialized Feature Description GRN is recorded against purchase orders. To know more about how to create purchase orders, refer to ...HHT - Cycle Count Process
Software Plan : Growth & Enterprise Account Type : Seller Account Inventory Type : Serialized & Non-Serialized Feature Description Cycle count is the process of tallying the physical inventory and the software inventory. Cycle Counts can quickly ...Wave Picking Configuration
What is Wave Picking? Wave picking is a way of short-interval scheduling where the system creates picklists at certain intervals. Managers, using the WMS, may assign groups of orders into short intervals called "waves" automatically, to initially ...