Integrating FOR Real-Custom Selfship with EasyEcom
This guide explains how to integrate FOR Real Marketplace with EasyEcom to manage orders, inventory, and fulfillment.
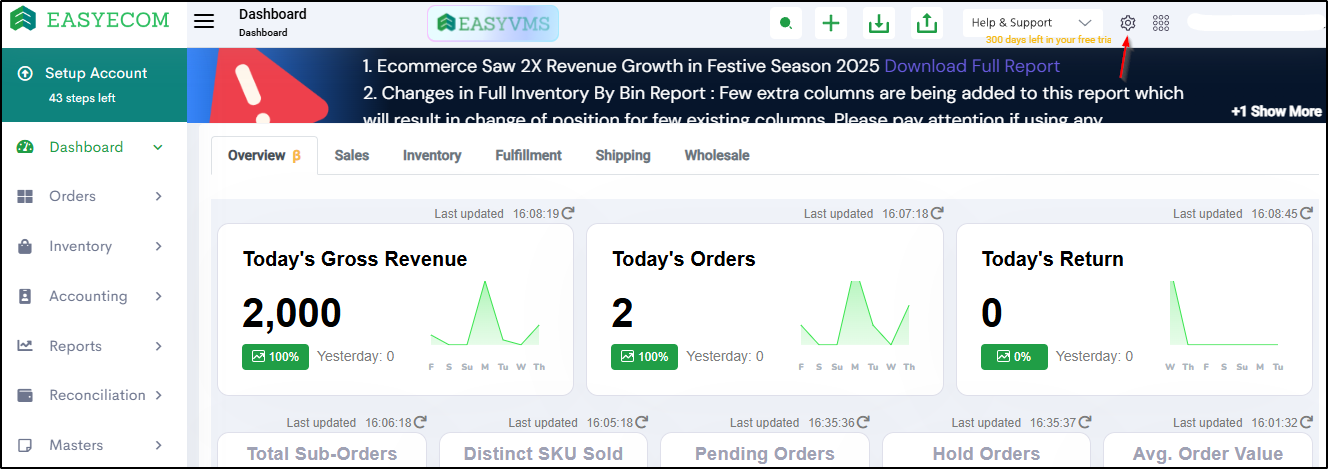
Step 1: Click on the Settings (⚙️) icon in the top-right corner
Step 2: Click on 'Add Channels'
You will be redirected to the channel selection page.
Step 3: Select 'For Real'
Once you click on it the following pop-up will appear:
Enter the API username & password and Click on Add Channel.
Keep Create Products Automatically disabled unless specifically instructed.
API Username & Password Details
The Username and Password entered here must be the EasyEcom API User credentials.
- The API user must be created by the client inside EasyEcom.
- The password must be set by the client.
- Ensure the API user has the required permissions for integration.
Refer to the following article for creating and defining user roles: Adding and Defining User Role in EasyEcom
Location Key Requirement
The channel is added under a specific warehouse location.
The same Location Key must be shared with the FOR Real team.
To find the Location Key, Click on:
Profile (Top Right Corner) → Copy Account Token / Location Key from the respective warehouse.
Details to be Shared with FOR Real Team
The following 3 details must be shared with the FOR Real team:
- API Username
- API Password
- Location Key
Step 4: Enable API Mode
Go to:
Settings → Sync Channels → For Real
Enable API Mode for the FOR Real marketplace.
API Mode is mandatory for Selfship marketplace integrations.
Order Flow
- Product listings are not automatically created via the integration. The seller must manually create or import listings in EasyEcom before orders can be processed.
- Customer places an order on FOR Real.
- Order is automatically created in EasyEcom.
- Seller confirms and processes the order.
- Seller ships the order and updates shipment details in EasyEcom.
- EasyEcom automatically updates FOR Real with:
- Order Confirmation
- Shipment / Manifest Status
- Tracking Updates
- Cancellation Updates
- Return Updates
Product listings are not automatically created via the integration. The seller must manually create or import listings in EasyEcom before orders can be processed.
Customer places an order on FOR Real.
Order is automatically created in EasyEcom.
Seller confirms and processes the order.
Seller ships the order and updates shipment details in EasyEcom.
EasyEcom automatically updates FOR Real with:
- Order Confirmation
- Shipment / Manifest Status
- Tracking Updates
- Cancellation Updates
- Return Updates
Integration Touchpoints
S No | API / Webhook Name | Endpoint URL | Direction | Trigger Type | Remarks |
1 | Get Auth Token | {{easyecom_base_url}}/access/token | Marketplace → EE | API | Used to generate authentication token |
2 | Create Order | {{easyecom_base_url}}/webhook/v2/createOrder?x-api-key={{easyecom_api_key}} | Marketplace → EE | Webhook | Order creation from FOR Real to EasyEcom |
3 | Fetch Inventory | {{easyecom_base_url}}/getInventoryDetailsV3?includeLocations=1&limit=50 | EE → Marketplace | API | Fetch inventory with location details |
4 | Mark Initiated Return API | (Endpoint as configured) | Marketplace → EE | API | Used to mark return initiation |
5 | Cancel Order | {{easyecom_base_url}}/orders/cancelOrder?x-api-key={{easyecom_api_key}} | Marketplace ↔ EE | Webhook & API | Supports both webhook and direct API cancellation |
6 | Confirm Order | https://smoked-share-sweat.medusajs.app/easycom/confirm | EE → Marketplace | Webhook | Triggered when order is confirmed |
7 | Shipped / Manifest | https://smoked-share-sweat.medusajs.app/easycom/shipped | EE → Marketplace | Webhook | Triggered when order is marked shipped |
8 | Mark Return | https://smoked-share-sweat.medusajs.app/easycom/mark-return | EE → Marketplace | Webhook | Triggered when return is marked in EasyEcom |
These endpoints receive automatic updates when the corresponding status changes in EasyEcom.
Return Initiation Note
If the client wants to initiate returns from FOR Real to EasyEcom,
they must contact
care@easyecom.io
(EasyEcom Support)
to enable this feature from the backend.
Important Operational Notes
- This is a Selfship integration. Seller manages shipping.
- SKU mapping between FOR Real and EasyEcom must be maintained.
- Inventory must be available in EasyEcom for order processing.
- Order status updates are automatically synchronized once integration is active.
- Cancellation is supported from both systems.