USN : Detailed document with Printing serialized barcodes
When you use serialized inventory and want to validate the correct serial at the GRN step where the serial no. barcode would have been generated before GRN, then use the USN feature to make your process more efficient.
USN Types
Type 1: Sellers who provide serials
Type 2: Sellers who autogenerate serials from EasyEcom
Type 1 ( Sellers Who Provide Serials )
USN Type 1.1 (USN-1): When you provide serials at the time of PO creation.

Step 1: Please create a PO by putting serial numbers via API Create Purchase Order
Step 2: In the toggle menu, please navigate to “Inventory>>Purchase Order”
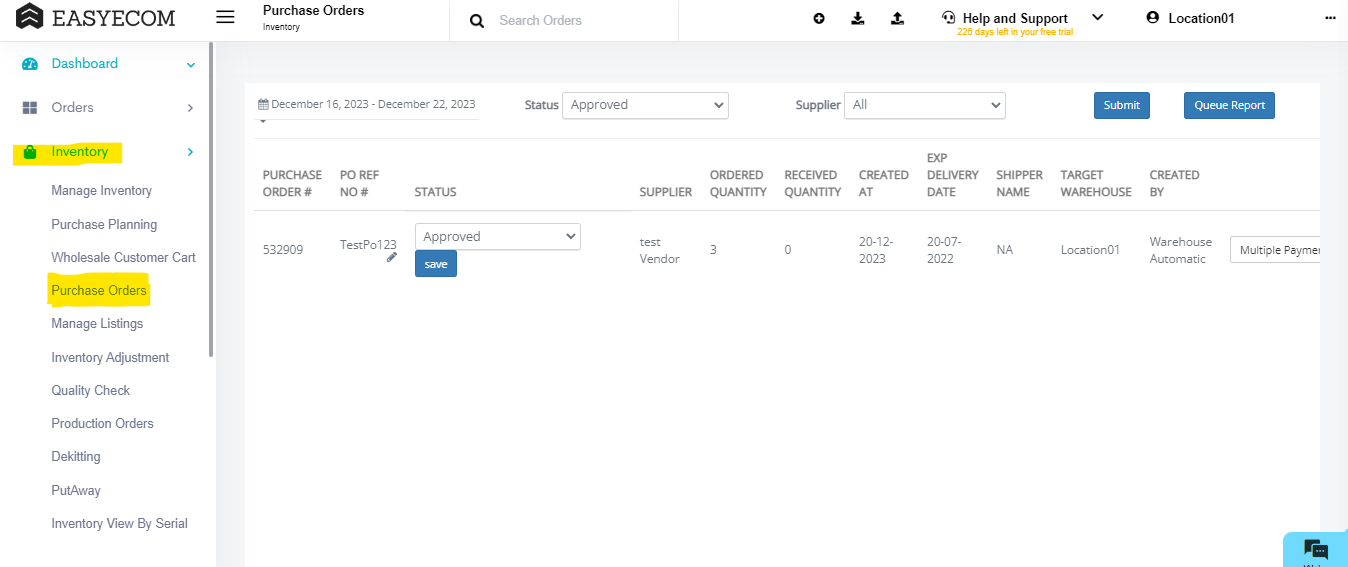
Step 3: Select the date range and status ( PO created through API remains in approved status)
Step 4: Submit
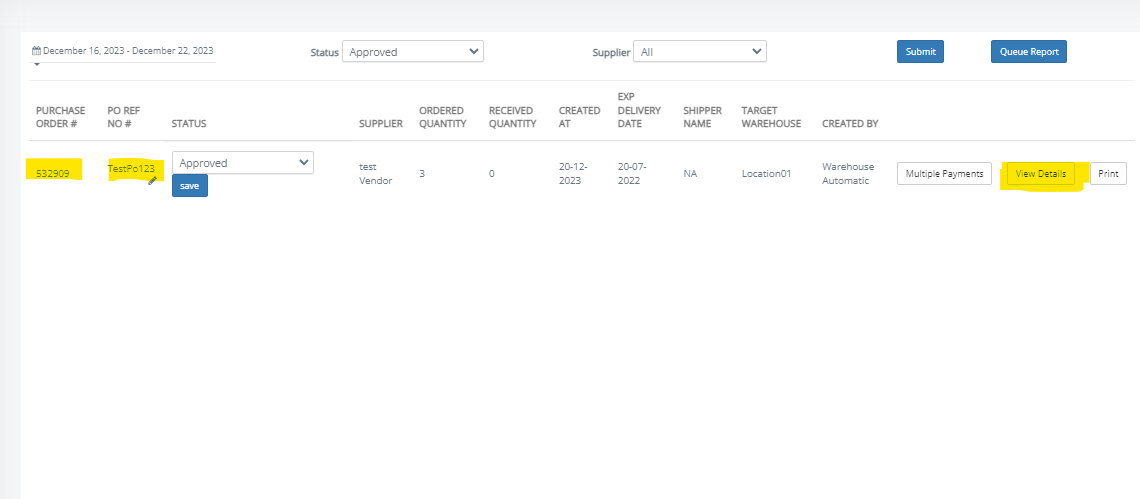
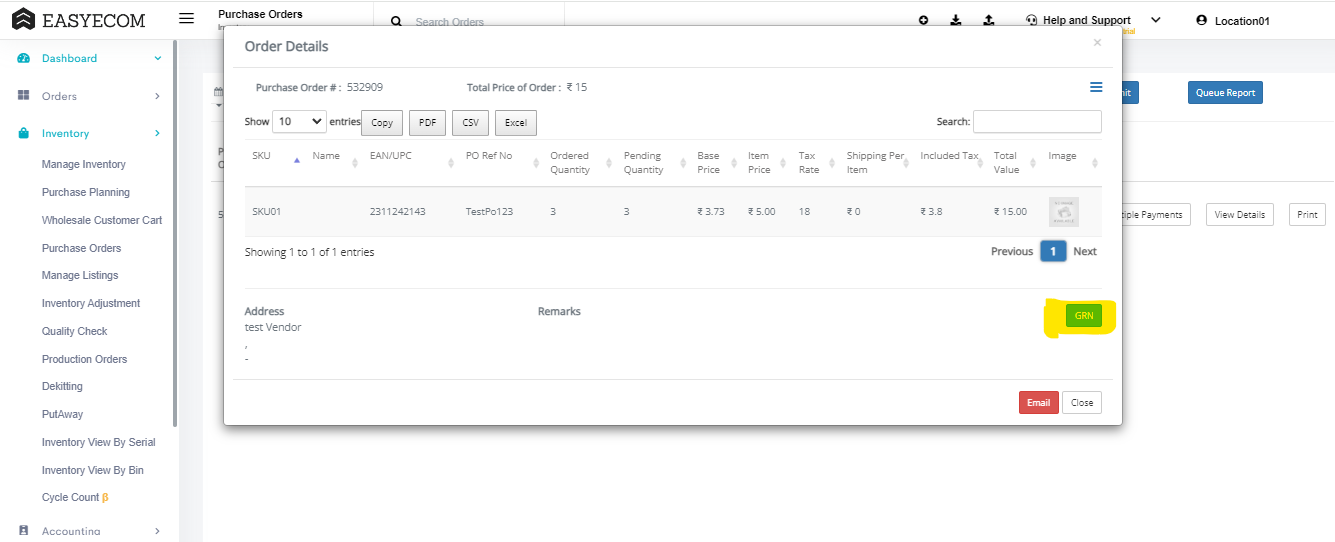
Step 5: Click on “View Details” to proceed with GRN
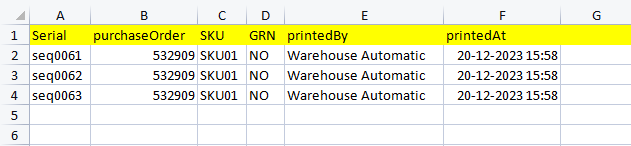
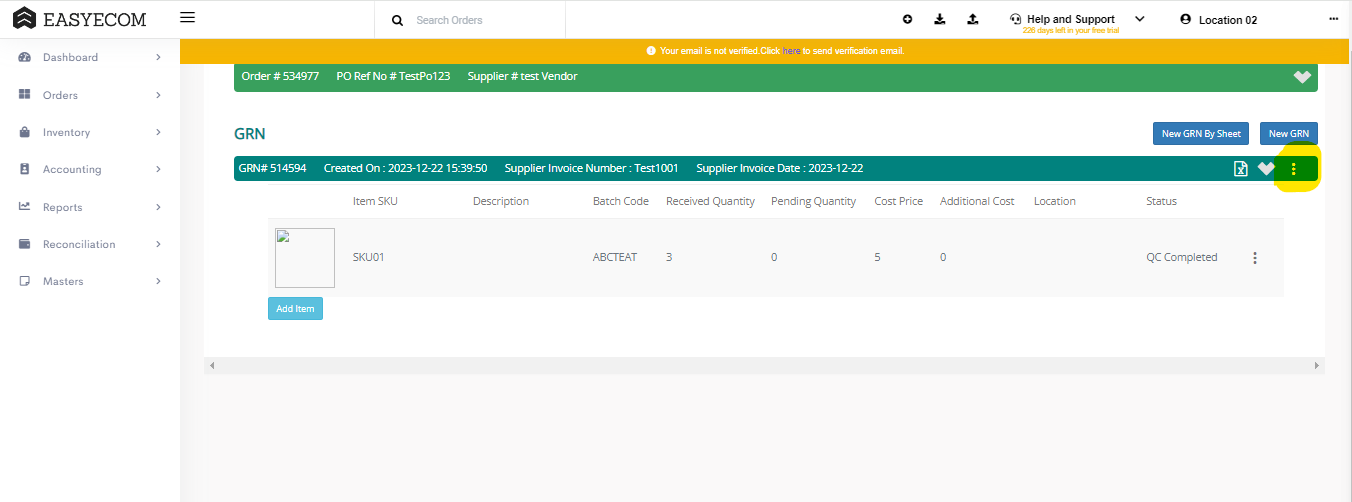
At this step, you may validate the the serials by clicking on the hamburger button>>Download USN report
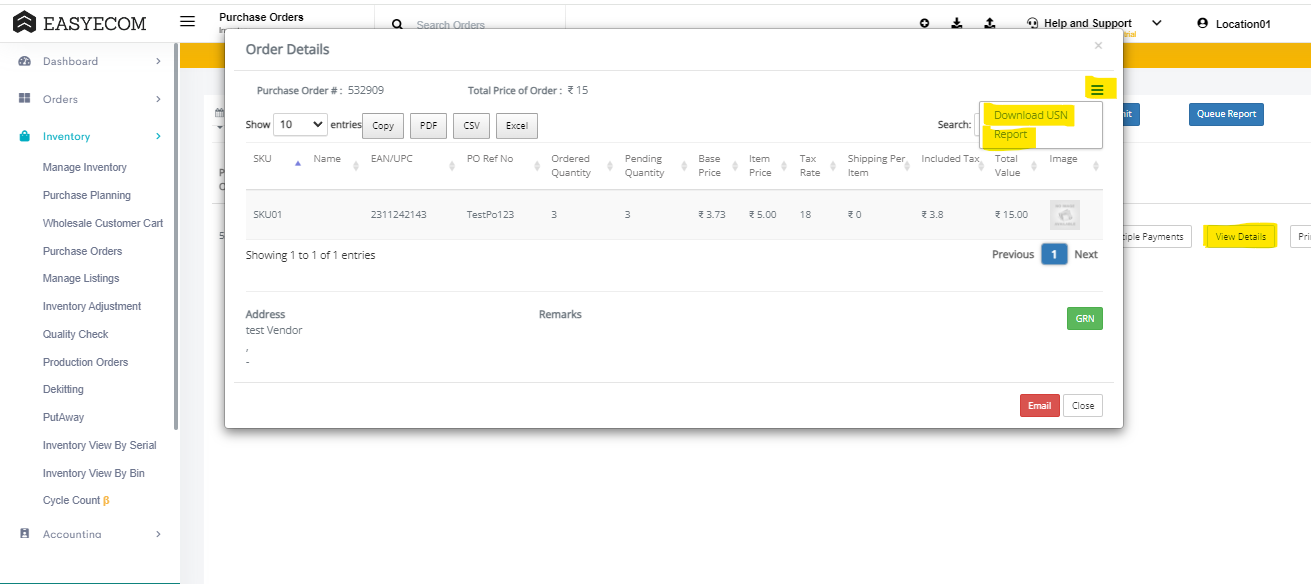
Report Format
Step 6: Click the “GRN” button
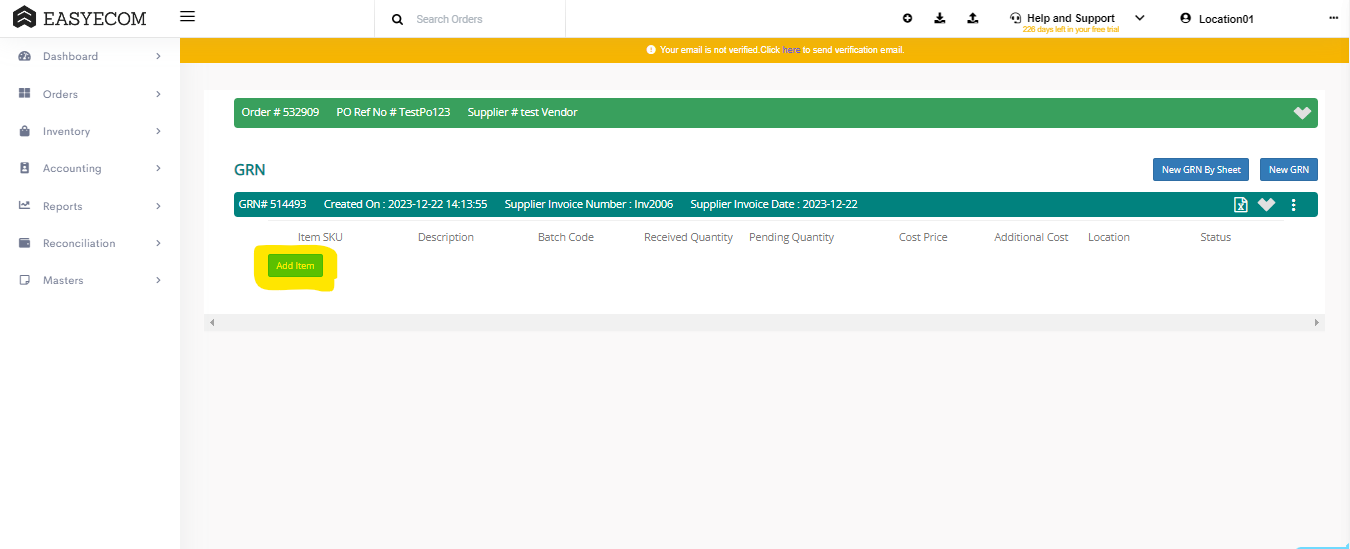
Step 7: Select “New GRN”

Step 8: Enter Supplier invoice ID and Date and then click on Create GRN

Step 9: Click on add Item and select the SKUs present there in PO
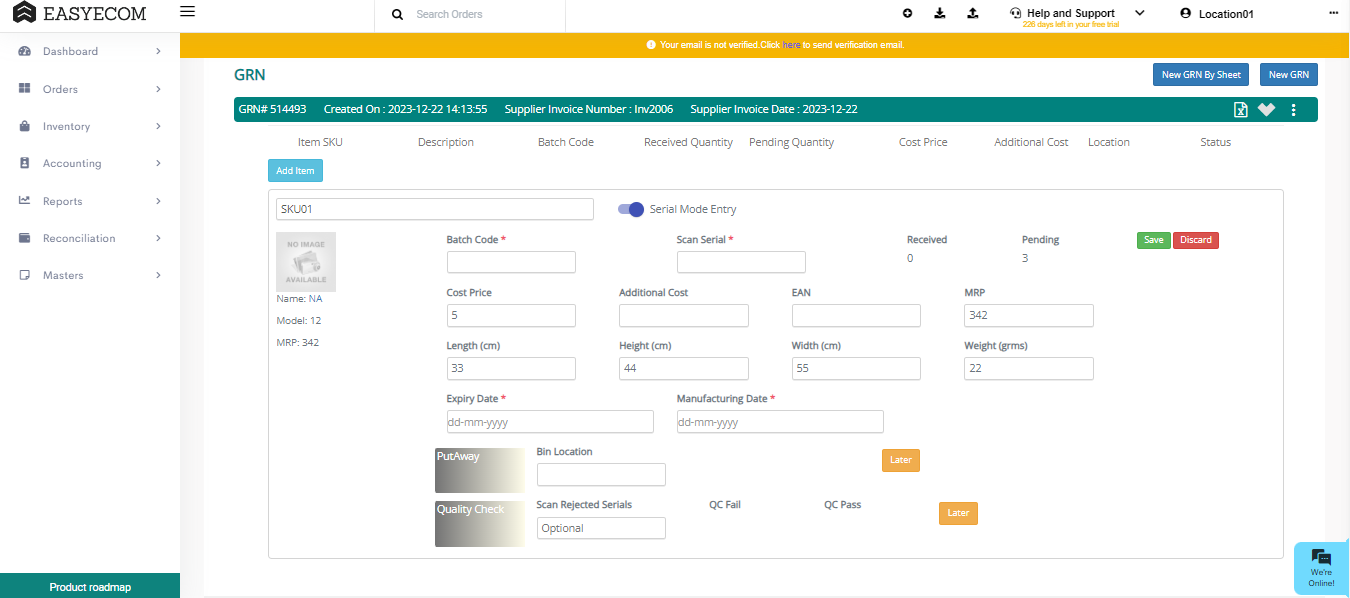
Step 10: fill in the Asterisk (*) Marked columns and Save
Points to be noted for USN: 1
It is mandatory to provide serial numbers at the time of PO creation.
Auto GRN won’t be allowed for your account if you operate in USN type 1
The Serials can not be auto-generated from the system for USN type 1
Serials will be saved in the USN table and will be validated from there as well.
Step 1: Please create PO (without serial number) via API Create Purchase Order
Step 2: In the toggle menu, please navigate to “Inventory>>Purchase Order”
Step 3: Select the date range and status ( PO created through API remains in approved status)
Step 4: Submit
Step 5: Click on “View Details” to proceed for GRN
Step 6: Click the “GRN” button
Step 7: Select “New GRN”
Step 8: Enter Supplier invoice ID and Date and then click on Create GRN
Step 9: Click on add Item and select the SKUs present there in PO
Step 10: Fill in the Asterisk (*) Marked columns, bin location, Scan Serial and Save
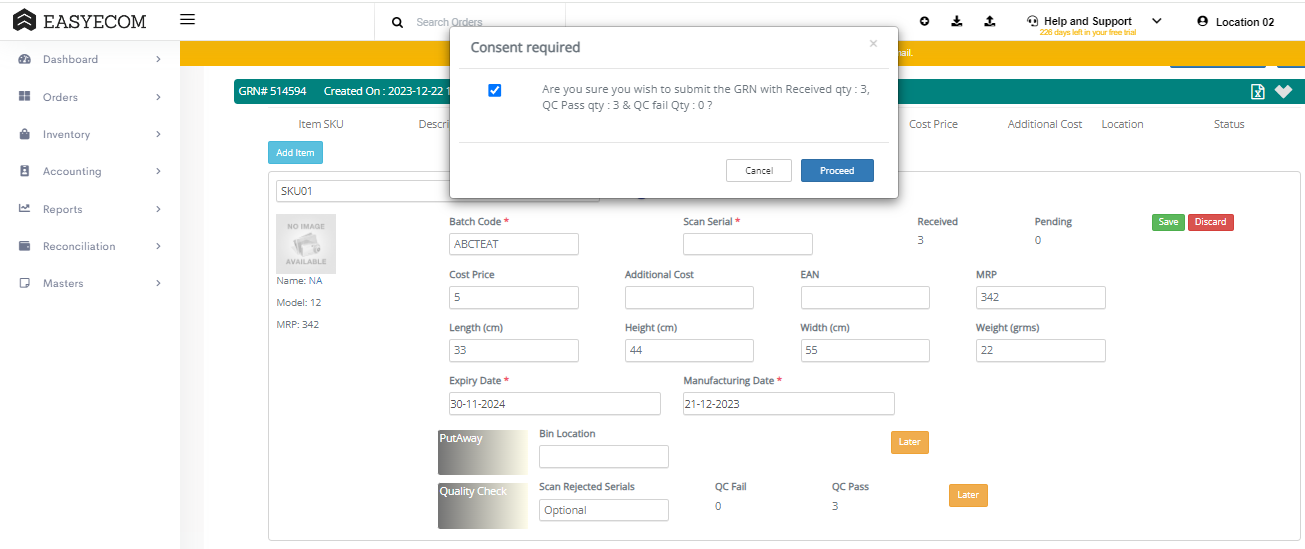
Provide your consent that all the entered details are correct and proceed
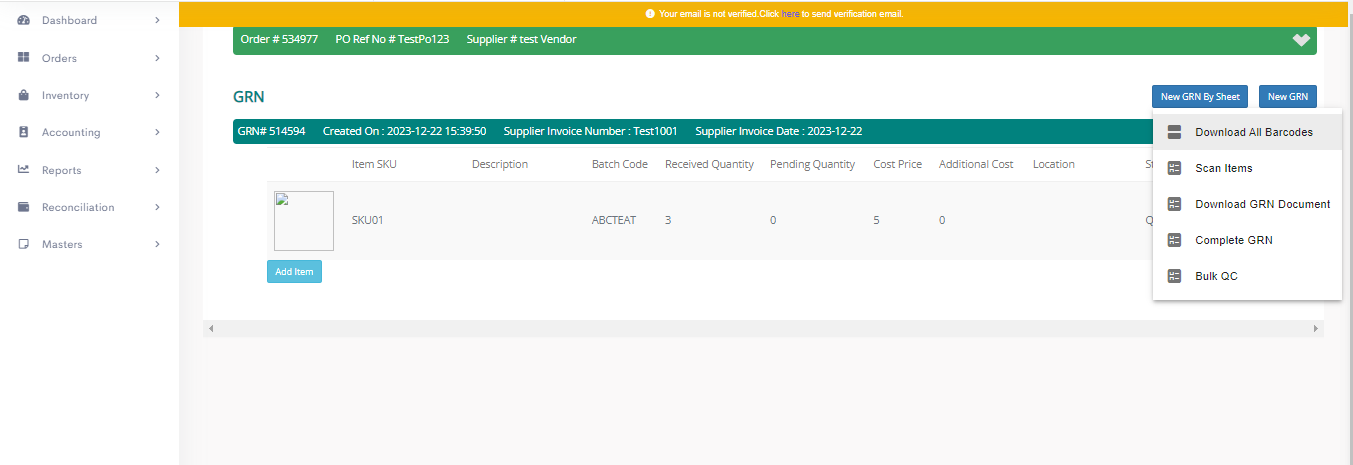
To download the barcodes, click on the hamburger button>>download all barcodes
Points to be noted for USN: 1.2
Serials will be provided and unique validation at the time of GRN
Auto GRN and GRN against PO, both are allowed.
Serial can not be generated from the system.
Type 2 (Sellers Who Autogenerate Serials from EasyEcom)
USN type 2.1 (USN:3) : When you generate serials after PO creation
Step 1: Please create PO via API Create Purchase Order
Step 2: In the toggle menu, please navigate to “Inventory>>Purchase Order”
Step 3: Select the date range and status ( PO created through API remains in approved status)
Step 4: Submit
Step 5: Click on “View Details”
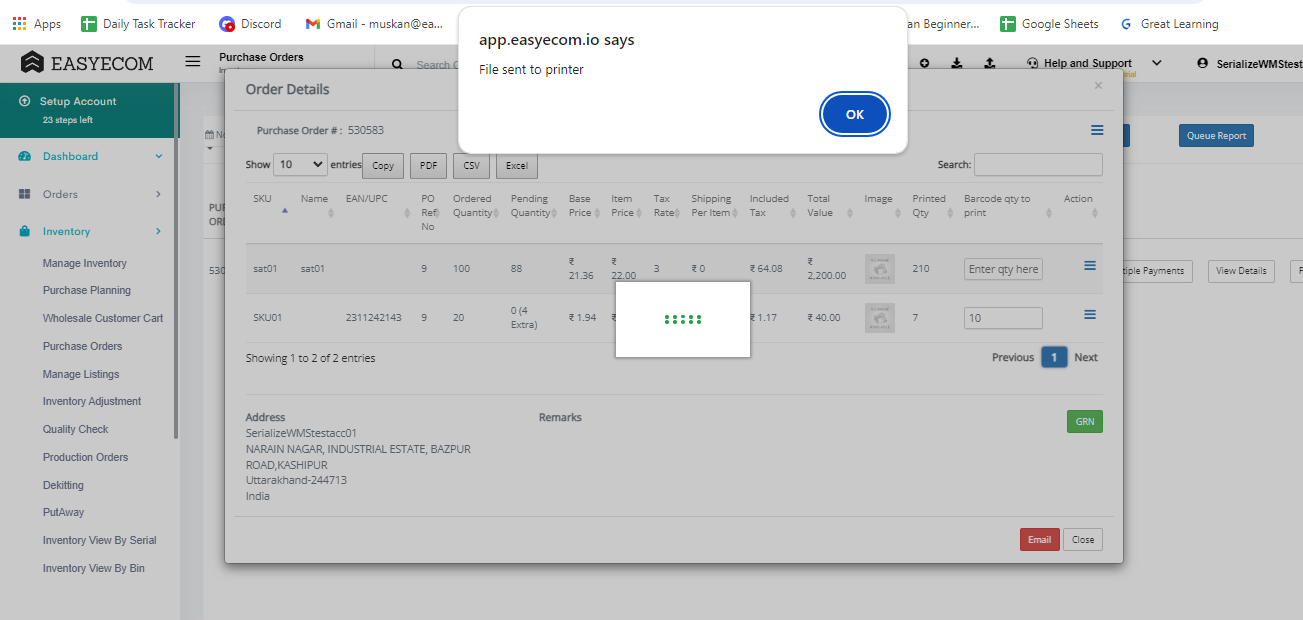
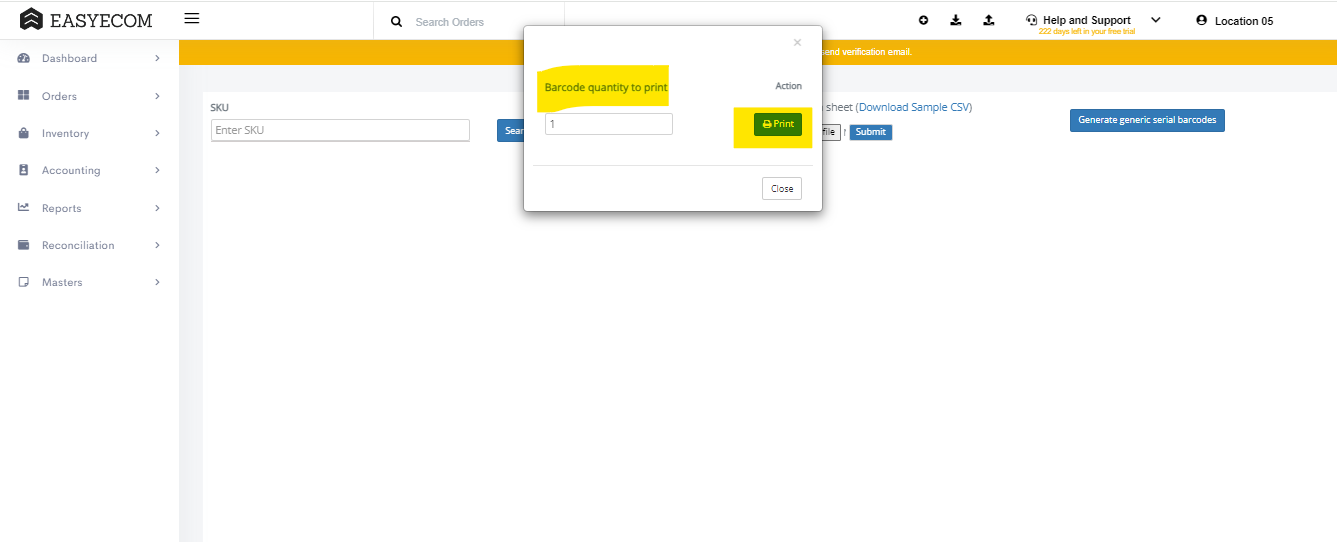
Step 6: Enter the Barcode Quantity to Print
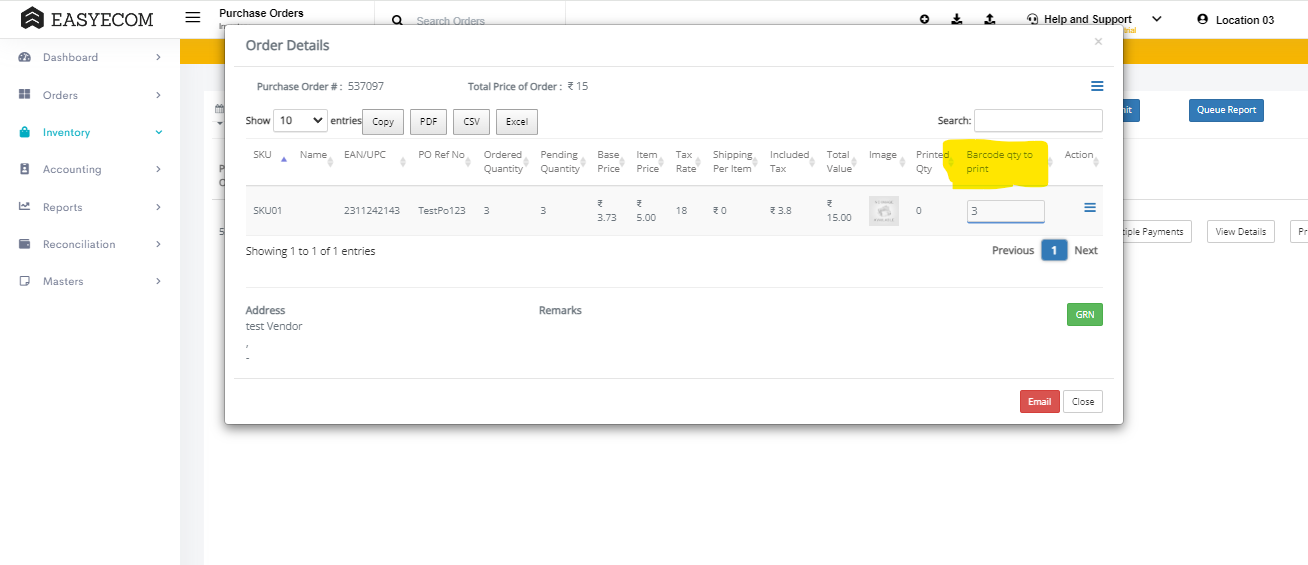
Step 7: Click Hamburger Button>> Generate Barcode
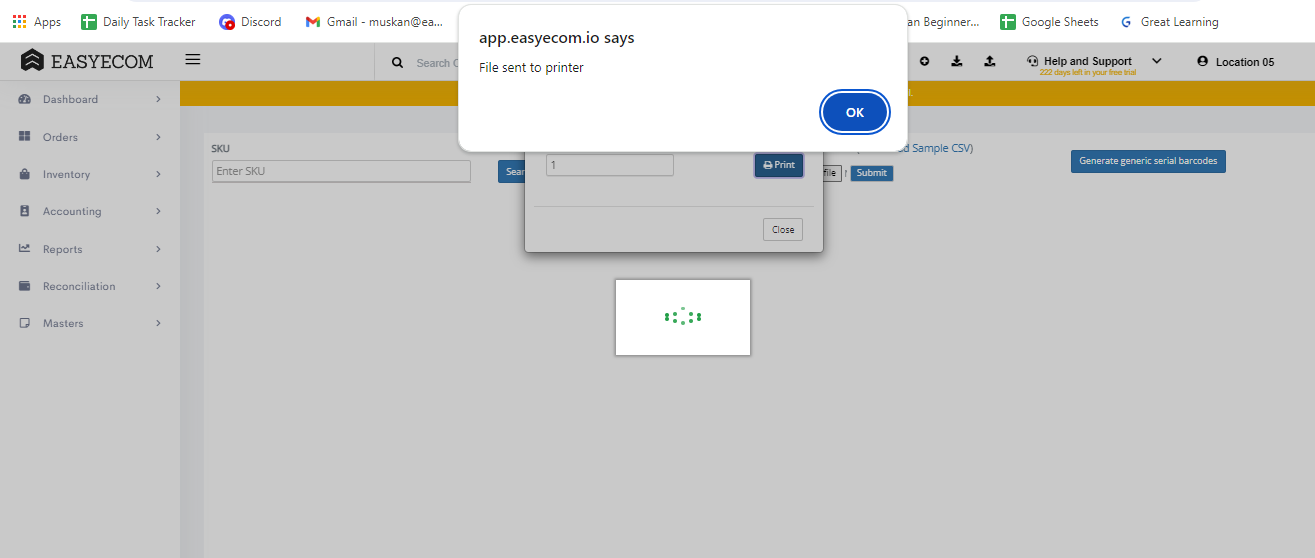
The Barcode print file is sent to the printer, click OK
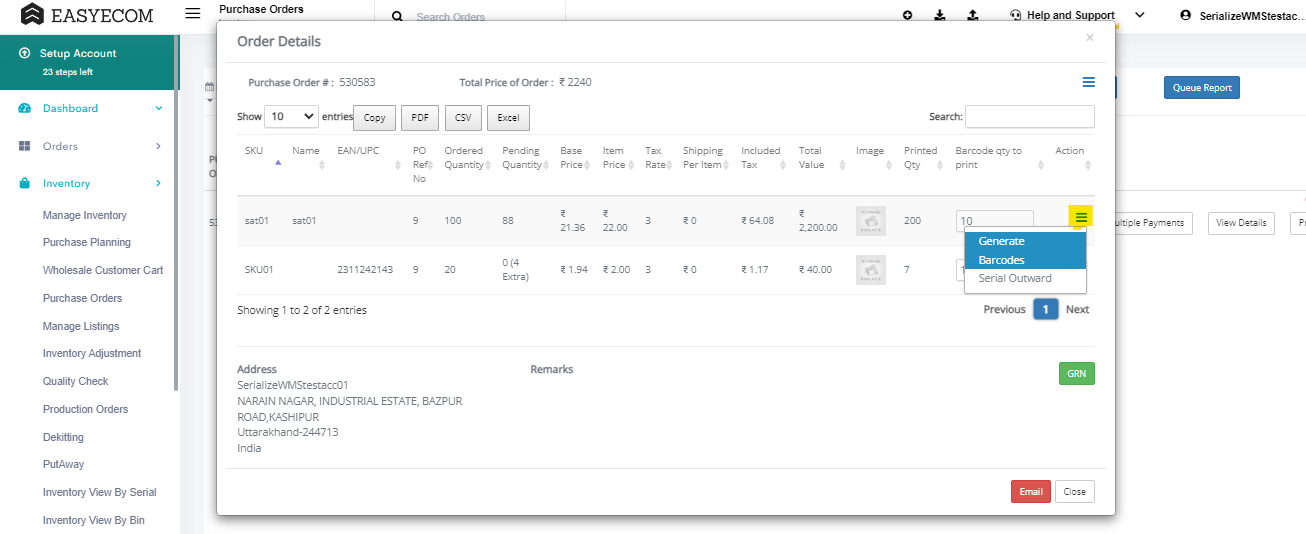
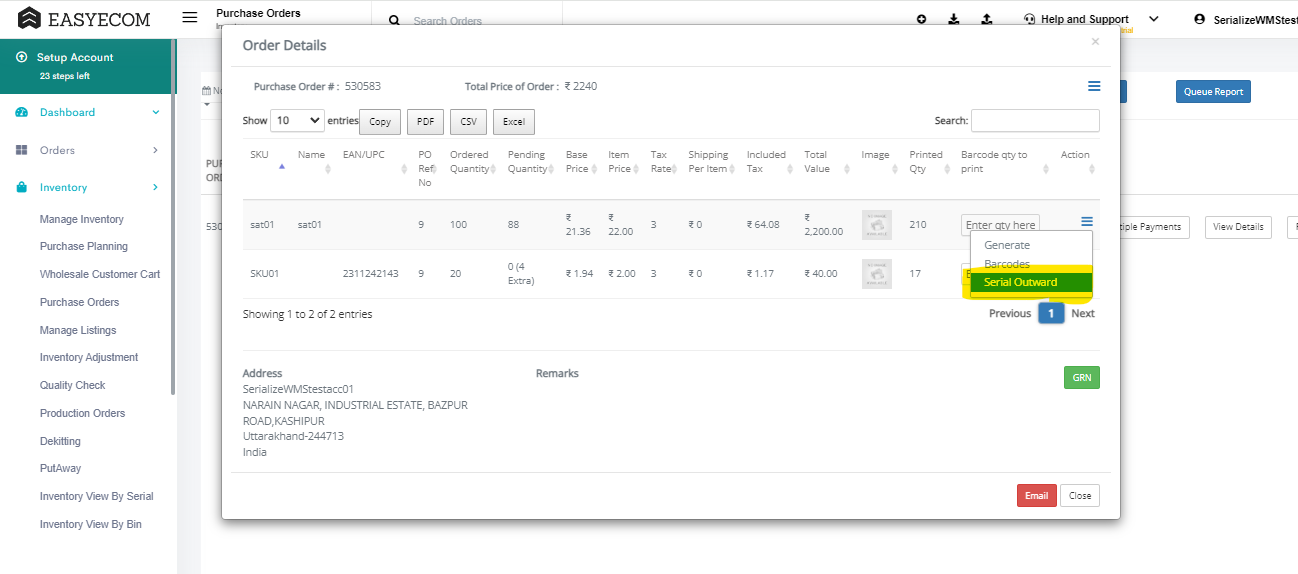
>> To get the Serial outwards, Click on the hamburger button in View details >> Click Serial Outward >> Scan (as shown in the image below)
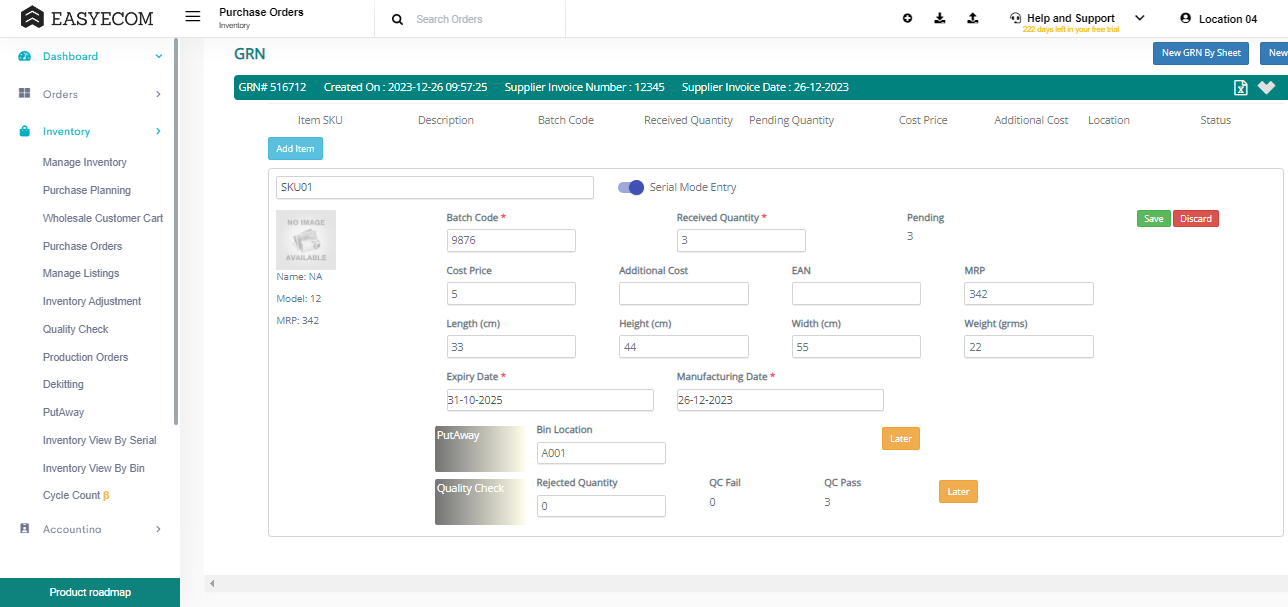
Step 8: Click on GRN >> New GRN >> Add Item >> Select SKU >> Scan Serial
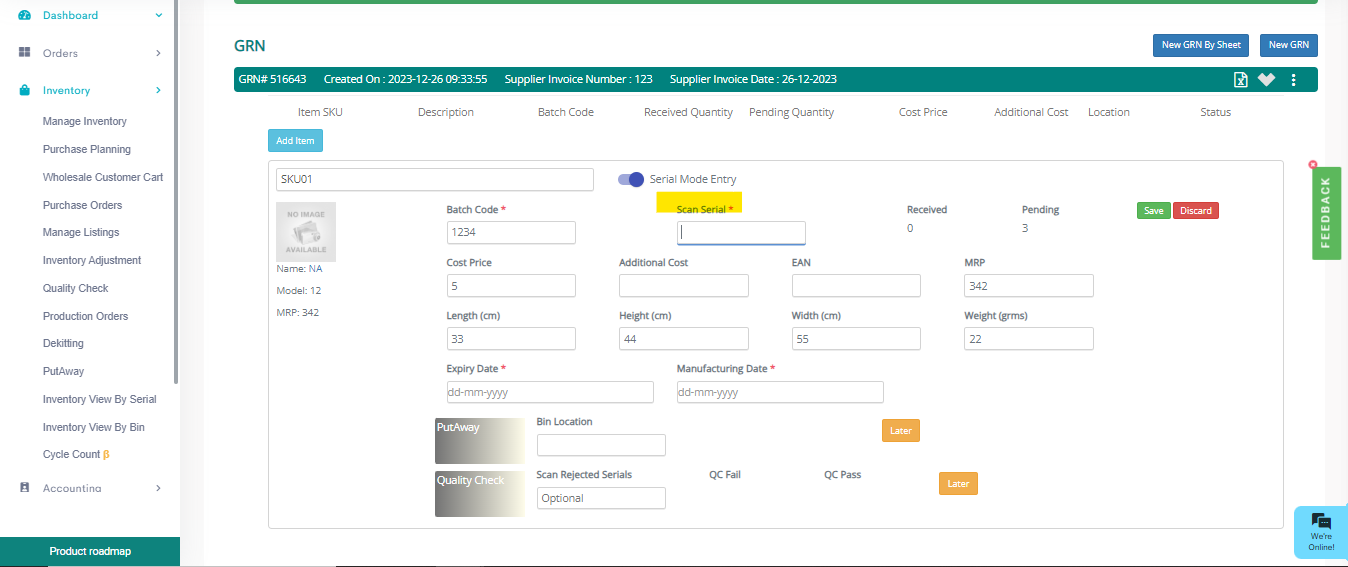
Fill in the required information (asterisk-marked fields are mandatory) and Save.
Provide your consent that all the entered details are correct and proceed
Points to be noted for USN: 3
Auto GRN is not allowed
While doing GRN, you just need to scan/provide the serial and the system will fetch all the information from there to perform GRN against the PO
USN Type 2.2 (USN-4): If you generate serials after GRN
Step 1: Please create a PO via API Create Purchase Order
Step 2: In the toggle menu, please navigate to “Inventory>>Purchase Order”

Step 3: Select the date range and status ( PO created through API remains in approved status)
Step 4: Submit
Step 5: Click on “View Details” to proceed for GRN

Step 6: Click the “GRN” button
Step 7: Select “New GRN”
Step 8: Enter Supplier invoice ID and Date and then click on Create GRN
Step 9: Click on add Item and select the SKUs present there in PO
Step 10: fill in the Asterisk (*) Marked columns and Save
Points to be noted for USN: 4
Auto GRN and GRN with PO are allowed.
You will have to provide SKU and quantity and the system will auto generate serials and map the serials with the SKU.
There is no need to provide serial numbers in this USN type.
USN Type 2.3 (USN-5): If you generate Serials from Generic Barcode Screen.
In this USN type, you can generate serial barcodes (process mentioned below) and while performing GRN you will have to enter the SKU and Serial simultaneously.
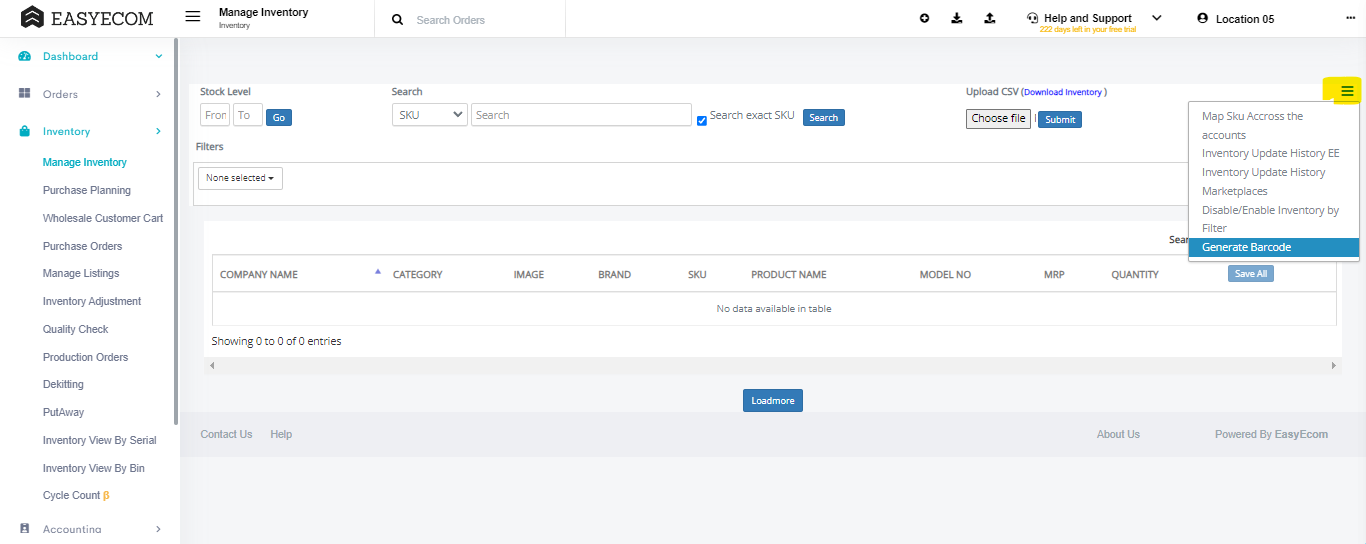
Step 1: In toggle menu, please navigate to the Inventory >>manage inventory>>click the hamburger button>> Select Generate Barcode
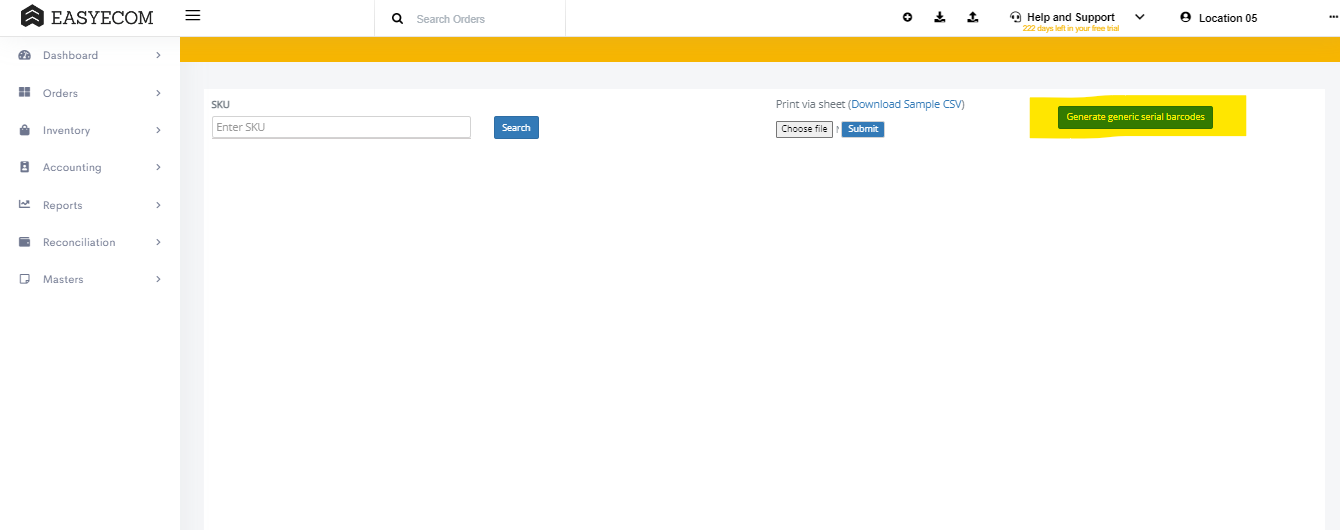
Step 3: Enter the Barcode quantity to print >> Print
Your serial barcodes are printed
Step 4: Please create PO via API Create Purchase Order
Step 5: In the toggle menu, please navigate to “Inventory>>Purchase Order”
Step 6: Select the date range and status ( PO created through API remains in approved status)
Step 9: Click the “GRN” button
Step 10: Select “New GRN”
Step 11: Enter Supplier invoice ID and Date and then click on Create GRN
Step 12: Click on add Item and select the SKUs present there in PO
Step 13: Fill in the Asterisk (*) Marked columns and Save

Serials are mapped against the selected SKUs.
Related Articles
ASN via Advanced Vendor Panel
Software Plan: Growth & Enterprise Account Type: Seller Account, Aggregator 3PL & Vendor Panel Inventory Type: Serialized USN Type: 3 Feature description This feature allows vendors to send an advance shipping notice to the sellers, offering better ...Unique Serial Numbers (USN) – Serialized Inventory Handling
Software Plan: Growth & Enterprise Account Type: Seller Account / 3PL Inventory Type: Serialized Inventory USN configurations are enabled at the account level by the Easyecom team. Overview Unique Serial Numbers (USN) is a configuration used to ...Serialized UoM : Multi-Level UOM Serial Handling (USN Type 1 & 2)
Software Plan: Growth & Enterprise Account Type: Seller Account Inventory Type: Serialized Overview This feature enables handling of serial numbers across multiple Units of Measurement (UOM) levels for a SKU. Instead of managing serial numbers only ...USN ( Unique Serial Numbers)
USN Category 1 - Sellers who provide serials Category 2 - Sellers who autogenerate serials from our system Category 1 : 1.1 Sellers who provide serials at time of PO creation (USN Type : 1) It is mandatory for these sellers to provide this ...Purchase Order Tolerance for Serialized Inward (USN Type 3)
Software Plan: Growth & Enterprise Account Type: Seller Account Inventory Type: Serialized Description Purchase Order Tolerance allows sellers using Serialized Inventory (USN Type 3) to inward quantity exceeding the original Purchase Order quantity ...