Recording Return to Vendor (RTV) Adjustments in EasyEcom
You can easily record Return-to-Vendor adjustments in EasyEcom one-by-one or in bulk.
Recording RTV one-by-one
Step 1: In the toggle menu, navigate to "Inventory>> Inventory Adjustment"

Step 2: Click on "Create Manual Adjustment"
Click on the hamburger menu and select “Create Manual Adjustment” option.

Step 3: Select "Return to Vendor" Adjustment and “Vendor”
Once you click on the Create Adjustment the following pop-up will appear:
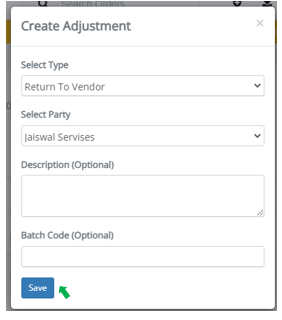
Here under "Select Type" click on "Return To Vendor" option and select a vendor from the drop-down options.
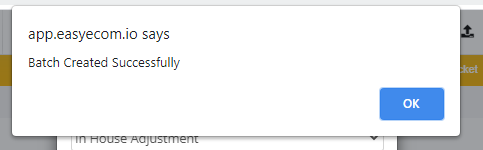
Then click on the "Save" button.
Once you click on it the system will generate a batch.
Step 4: Click on "Details"
Once your Return to Vendor batch is created in the system, click on "Details".

Step 5: Enter necessary details
Once you click on Details, the Batch details pop-up will appear.
Here enter the SKU you want to return and select ``Returned to Source” as the “New Status”.

Step 6: Click on "Complete"
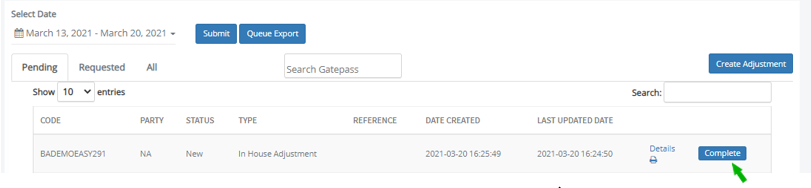
Now click on the "Complete" button.

Once you click on it you batch will be updated.
You have now successfully recorded RTV adjustment
Recording RTV Adjustments in Bulk
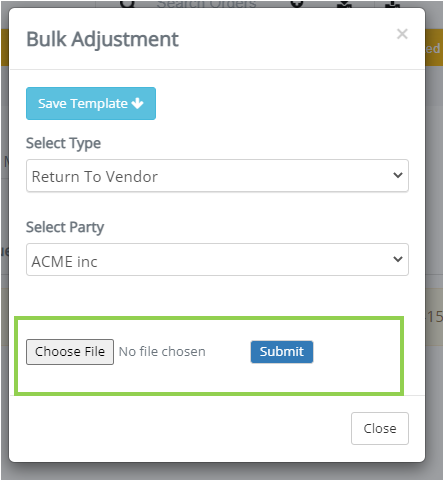
Step 1: Click on "Bulk Adjustment"
Click on the hamburger menu and select the “Bulk Adjustment” option.

Step 2: Select "Return To Vendor" option

Select "Return to Vendor" option and download the bulk template file.
Step 3: Record necessary details
In the excel file record RTV details and save the file.

Step 4: Upload File
Click on "Choose File" to upload your file.
Then click on "Submit".
You have now successfully recorded RTV adjustments in bulk.
Related Articles
ASN via Basic Vendor Panel
Software Plan: Growth & Enterprise Account Type: Seller Account, Aggregator 3PL & Vendor Panel Inventory Type: Non-Serialized USN Type: 2, 4, 5 Feature Description This feature enables vendors to send an advance shipping notice to sellers, providing ...ASN via Advanced Vendor Panel
Software Plan: Growth & Enterprise Account Type: Seller Account, Aggregator 3PL & Vendor Panel Inventory Type: Serialized USN Type: 3 Feature description This feature allows vendors to send an advance shipping notice to the sellers, offering better ...Vendor Order Fulfillment with Invoice Generation
Software Plan: Growth & Enterprise Account Type: Seller Account & Aggregator 3PL Inventory Type: : Serialized & Non-Serialized Feature description This feature streamlines the order fulfillment process between sellers and vendors. Seller Actions: A ...Creating Bulk Map Vendor with SKU
Step 1: Go to Masters ---------> Vendor Master Step 2: Click on Bulk Map vendor with SKU Step 3: Click on Save Template to download the CSV sheet Step 4: Fill in the columns in the sheet, and then choose file and upload. The file will be uploaded ...Creating Vendor in EasyEcom
Step 1: Go to the navigation menu > Masters > Vendor Master Step 2: Go to the hamburger menu > Add new vendor Step 3: Add the details and submit Add the vendor's name, email, and vendor code. You can enter any number as a vendor code as per your ...