Integrating Myntra PPMP with EasyEcom (New Account)
By following the below-mentioned procedure you can easily integrate Myntra PPMP with EasyEcom.
Step 1: Click on the Settings⚙️icon on top the top right corner
Step 2: Click on 'Add Channels'
Once you click on 'Add Channels' you will be navigated to the following page.
Step 3: Select 'Myntra PPMP'
Here please click on the “Myntra PPMP” button.
Once you click on it the following pop-up will appear:
You are required to enter your Merchant ID (seller ID), Warehouse ID, Secret Key and Webhook Token and Seller SKU Code.
Webhook token is the EasyEcom seller ID - For this, click on the meatball menu and copy the number displayed below your Account Name.)
Please share the given Warehouse ID and Webhook Token with the Myntra Team,
Post this Myntra team will share the Merchant ID (seller ID) and Secret Key. Please add the provided credentials in the Myntra add channels popup.
Now please add any Marketplace SKU in the Seller SKU Code [ To validate the warehouse ID. We will perform a push operation with two different inventory quantities: 1 & 0 inventory to entered SKU]
Select Tagloop Activation as "Yes", if you want to are enabled for the Myntra tagloop and will require the tagloop scanning features.
Then click on the “Add Channels” button. Once you click on it, your Myntra PPMP account will be added in our system.
Step 4: Integrating your Myntra PPMP Listings in EasyEcom
Navigate to Inventory > Manage Listings > Click on (☰) Hamburger Menu > Import Listing button
Click on the “Download Template Sheet” button.
Once you click on it Generic Listings Import Excel file will be downloaded in your system.
Mandatory fields in this file are SKU, GUID, Listing Reference Number, and Identifier
Enter your Vendor SKU Code in SKU, GUID and Listing Reference Number column.
Enter your ASIN in the Identifier column.
In case you don't know your 'Seller SKU code' , download your Myntra Product Listings file and copy the 'Seller SKU code' from it
In case you don't know your 'Seller SKU code' , download your Myntra Product Listings file and copy the 'Seller SKU code' from it
Select your marketplace as 'Myntra PPMP'
Click on the “Choose File” button and select the Generic Listings Import File from your system.
Then click on the “Upload” button.
Myntra sheet is as below(for reference)
Step 5: Map your Products with EasyEcom
Follow the manual mapping process to map your Myntra products with EasyEcom.
You have now successfully integrated Myntra PPMP with EasyEcom and mapped your product listings
How to use Tagloops in EasyEcom:
Myntra has introduced the Tag-loop feature for scanning the forward shipments with the tagloop ID entries, If an Order in EasyEcom calls for Tag-loop entry, the seller can use this functionality by following the instructions below:
1. Without Packing Station:
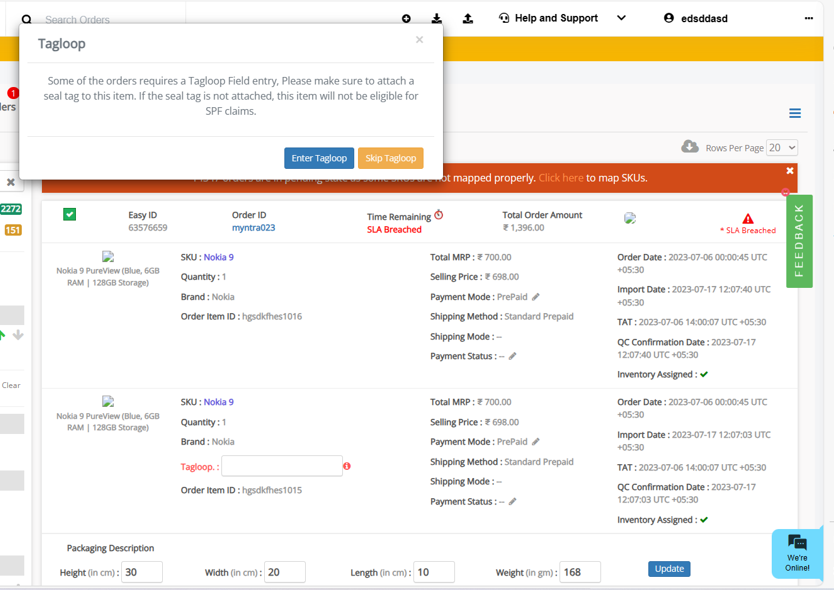
a. Any order that needs the tagloop to be scanned will be imported into EasyEcom with the following feasibility:
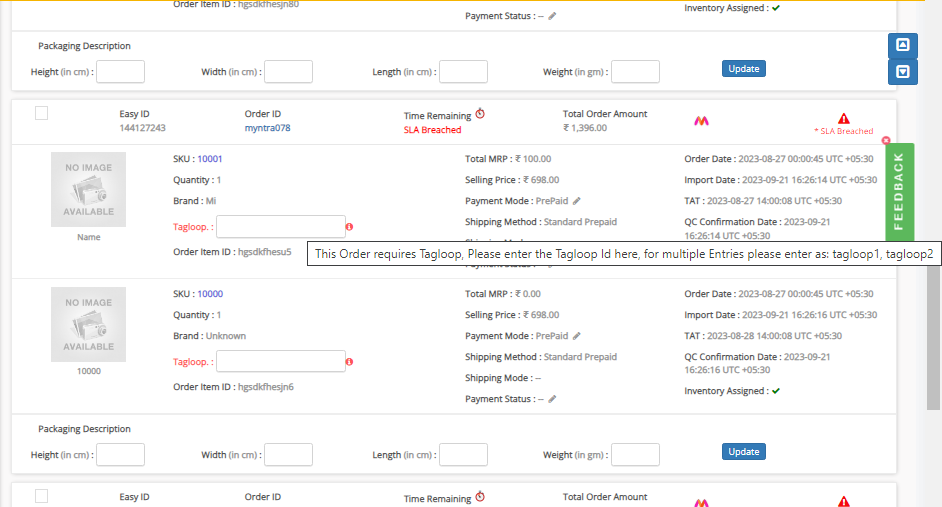
b. Sellers must scan the Tag-loop ID into the appropriate Tagloop Field, this step is necessary prior to the confirmation of order in the New Order page or Unconfirmed tab [if batch mode is enabled].
c. If the mandatory field is left empty, a warning pop-up in the format below will be displayed:
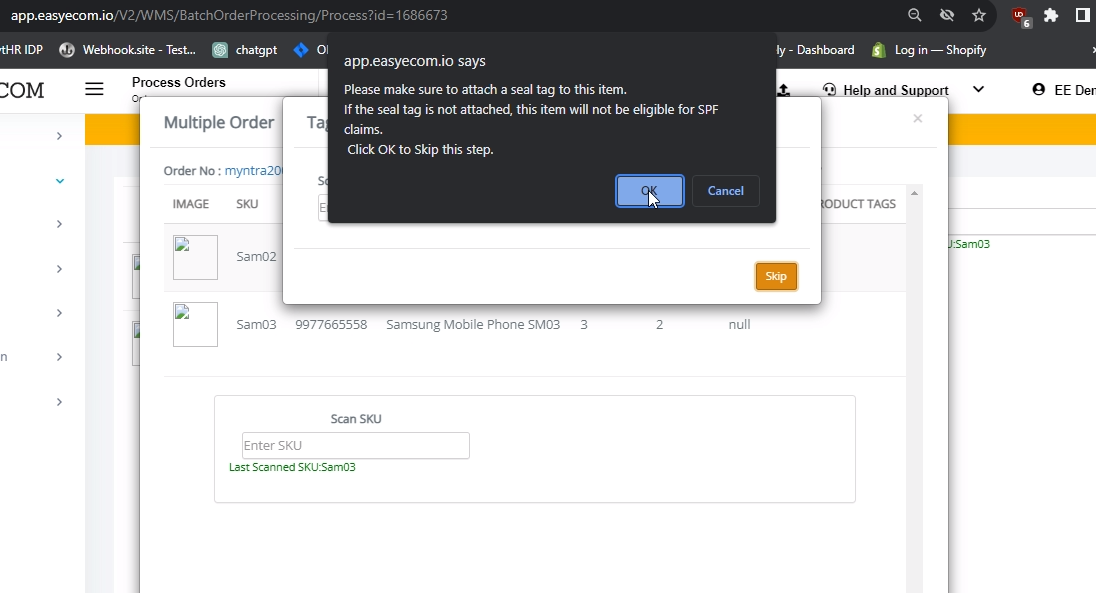
2. With Packing Station:
a. Sellers will be able to scan any line items that require tagloop scanning in the packing station after scanning the SKUs and serial numbers
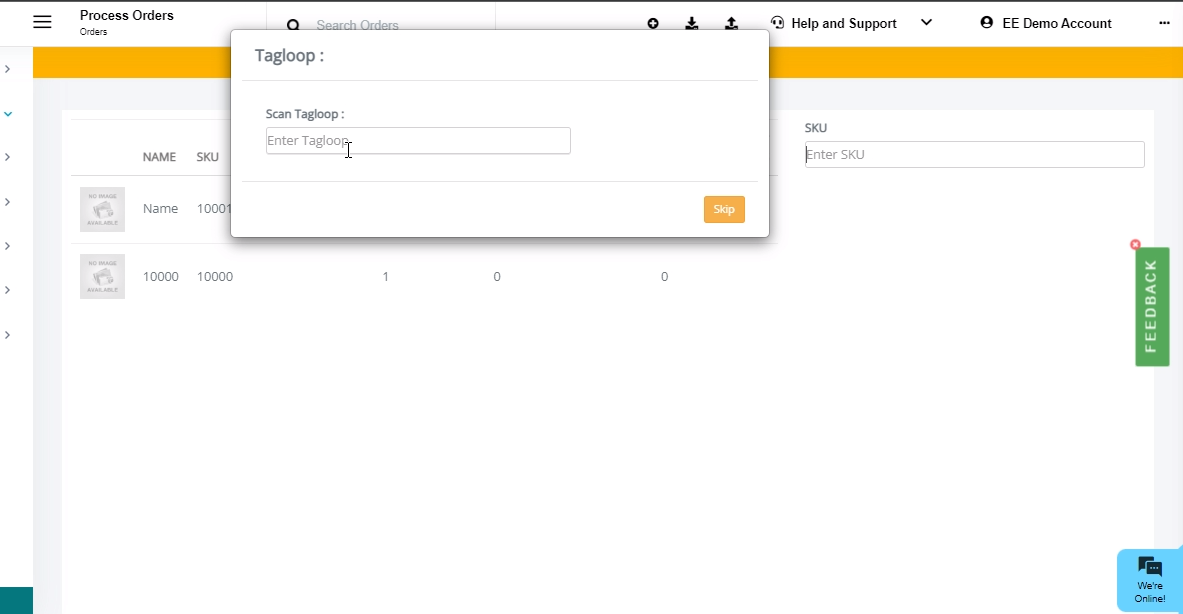
b. Sellers must Scan the Tagloop ID into the appropriate Tagloop Field. If the required field is left empty, a pop-up warning in the following type will be dispalyed
- Please find out details about Myntra Tag-loops on below Links:
Note:
- Myntra PPMP will push orders in EasyEcom
- The webhook token (Myntra PPMP token) recorded while integrating the first account in EasyEcom, should be used for integrating Myntra PPMP with other locations (child/primary) as well.
For example, let's say you first integrate Myntra PPMP with Primary Location. The webhook token and warehouse ID will remain same. Moving forward, while integrating child locations you have to use the same webhook token and record child location's warehouse ID.
In case, you first integrate with any child location in the system, enter child location's warehouse ID. While integrating with primary account enter the same webhook token and primary location's warehouse ID. - For Multiple Myntra account in the same location you need to add the Myntra PPMP-2 with below configuration:
Webhook token as:"{Primarysellertoken}_2"
Warehouse Id as "{locationsellertoken}_2"
The Myntra's seller account that has been added at any location as MyntraPPMP-2 needs to be always added as Myntra PPMP-2 to for all separate locations.
b. Sellers must scan the Tag-loop ID into the appropriate Tagloop Field, this step is necessary prior to the confirmation of order in the New Order page or Unconfirmed tab [if batch mode is enabled].
c. If the mandatory field is left empty, a warning pop-up in the format below will be displayed:
2. With Packing Station:
a. Sellers will be able to scan any line items that require tagloop scanning in the packing station after scanning the SKUs and serial numbers
b. Sellers must Scan the Tagloop ID into the appropriate Tagloop Field. If the required field is left empty, a pop-up warning in the following type will be dispalyed
Please find out details about Myntra Tag-loops on below Links:
Note:
- Myntra PPMP will push orders in EasyEcom
- The webhook token (Myntra PPMP token) recorded while integrating the first account in EasyEcom, should be used for integrating Myntra PPMP with other locations (child/primary) as well.
For example, let's say you first integrate Myntra PPMP with Primary Location. The webhook token and warehouse ID will remain same. Moving forward, while integrating child locations you have to use the same webhook token and record child location's warehouse ID.
In case, you first integrate with any child location in the system, enter child location's warehouse ID. While integrating with primary account enter the same webhook token and primary location's warehouse ID. - For Multiple Myntra account in the same location you need to add the Myntra PPMP-2 with below configuration:
Webhook token as:"{Primarysellertoken}_2"
Warehouse Id as "{locationsellertoken}_2"
The Myntra's seller account that has been added at any location as MyntraPPMP-2 needs to be always added as Myntra PPMP-2 to for all separate locations.
Related Articles
Integrating Myntra JIT with EasyEcom
By following the below-mentioned procedure you can easily integrate Myntra JIT with EasyEcom. Step 1: On the dashboard, click on the “Three dots aka meatball menu” Step 2: Click on the “Account Settings” option Once you click on the meatball menu, ...Integrating Myntra with EasyEcom
By following the below-mentioned procedure you can easily integrate Myntra with EasyEcom. Step 1: Click on the Settings⚙️icon on top the top right corner Step 2: Click on 'Add Channels' Once you click on 'Add Channels' you will be navigated to the ...Integrating Myntra SJIT with EasyEcom
Description This article explains how to integrate Myntra SJIT with Easyecom. Myntra SJIT uses Myntra-managed warehouses for fulfilment. Sellers must obtain specific credentials from Myntra to enable this integration. By following the below-mentioned ...SKU, QTY and Tagloop in the Shipping Label
Software Plan: Starter, Growth & Enterprise Account Type: Seller Account Inventory Type: Serialized & Non-Serialized Feature Description This feature allows sellers to customize the information displayed on their shipping labels based on their ...Integrating Loqally with EasyEcom
This guide explains how to configure the Loqally integration in EasyEcom, and also supports reverse shipment. Step 1: Navigate to Carrier Master Masters > Carrier Master Step 2: Click on 'Add New' and Select 'Loqally Outbound' from the dropdown Step ...