Integrating Ajio Dropship with EasyEcom
Integrating AJIO Dropship with EasyEcom
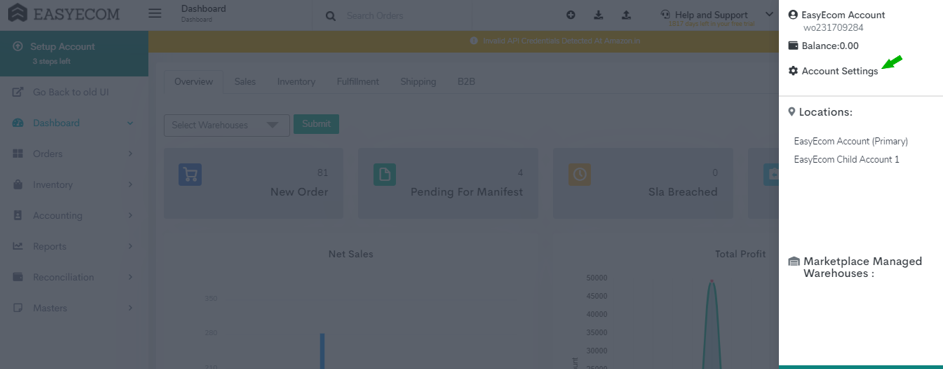
Step 1: Click on the 3 dots -> “Account Settings”
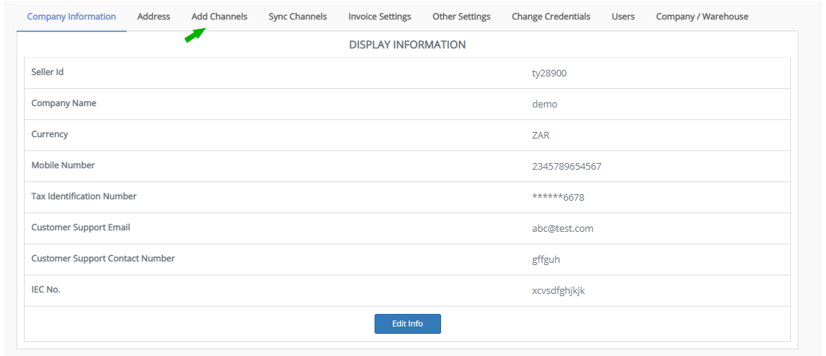
Step 2: Click on “Add Channels”
Step 3: Select Marketplace “AJIO”
Once you click on it the following pop-up will appear:
You are required to enter your:
Username - Please enter POB of AJIO
Password - Please enter the API Password in this field,
Click on "Add channel"
Step 4: Update Return Sync Channel settings for AJIO Dropship
Note: If you enable the "Create Products Automatically" option, EasyEcom will automatically create a Master SKU of all your listed SKUs in AJIO JIT. This is the easiest way to mirror the catalogue from AJIO JIT to EasyEcom.
If you choose to not enable “Create Products Automatically”.
You'll need to Separately Create and map the Master products and Marketplace Listings.
Important Notes:
For Seller Cancellations, please cancel the Order Before QC-pass status.
Kindly follow the below steps before onboarding in the AJIO Channel:
Please process all orders from the Old OMS/AJIO panel directly along with all the returns and push 0 Inventory for all the SKUs from the OMS partner/AJIO panel.
Post this the Account Migration will be started by AJIO team.
Brands need to raise the migration request with their AJIO KAMs keeping Integrations@easyecom.io in cc.
Once account Migration Confirmation is received from the AJIO.
Please Note: You are required to Reset the last POB password before integration with EasyEcom, Please login to your AJIO account and reset your POB Password from settings>>Reset POB Password option.
The Channel needs to be added in EasyEcom and need to ensure Inventory Push for only 1 SKU and test for 1 Order Processing. [This is mandatory]
You can use the Disable/Enable Inventory by Filter in the Hamburger menu of the Manage Inventory settings for this activity for AJIO dropship as a Channel and remove this once the Go-Ahead is received in point h.
Once this is successfully completed, the Brand needs to send the Invoices and Labels for the Order with AJIO team for Verification.
Once the Go-ahead is received the Brand can go-Live with the complete Inventory-Live for the Integration.
The Listings can be Synced for the Channel via Sync Listings.
The EasyEcom invoice number will be used as default Invoice number for e-invoicing and will be updated to Ajio b2b invoice as well, Please contact customer support if you want to enable the AJIO invoice number for e-invoicing and credit note generation istead of EasyEcom invoice number and series.
Incase brand is unable to find any Marketplace listings with SKU code Try searching the Jiocode of the SKU in the Unmapped listing Excel Sheet. section
In EasyEcom, Initially by default all Orders will be available in Failed section of New Order tab,
Seller is required to Mark the Orders as QC-confirm which is equivalent to AJIO's Order Acceptance.
For Automated QC confirm pls contact EasyEcom support to enable the same
Seller can either Mark QC for any specific order or in Bulk as shown in the below sample images.
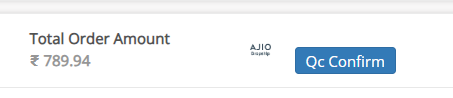 For Specific order
Confirm Order in EasyEcom is equivalent to B2B Invoice generation in AJIO.
All Returns from AJIO will be displayed in the Pending Return Reports,
Once the return orders are delivered in the Warehouse, Brand needs to perform qc for the received order.
Post QC the Credit-Note will be generated in next 2 Hours for Downloading the Credit Note.
If seller is under E-Invoicing Bracket, Brands have 2 Options:
If Seller is maintaining Offline E-Invoicing filling, He needs to take approval from AJIO team to go-ahead with EasyEcom without E-Invoicing.
If Seller is Already Integrated with AJIO for E-Invoicing, you need to integrate GST Hero with EasyEcom. After you have integrated GST Hero, go to "Sync Channels" and activate the "Generate E-invoice for B2B orders" checkbox.
If E-invoicing is on from the sync channel page, the B2b Invoice will be generated with E-Invoice details and credit note for returns will be the E-credit note.

Priority Order Handling:
Any order imported via AJIO Dropship is categorized based on three priority flags:
- RUSH: Used for hyperlocal orders with a delivery TAT of 4 hours, same-day delivery (SDD), or next-day delivery (NDD).
- HIGH: Typically used for SDD, NDD, and 2-day delivery (2DD) orders.
- NORMAL: Standard shipping option for orders with a delivery time greater than 2 days.
Custom Field on Order Details Page
-
Each order will have a
Order_priorityfield indicating Normal, High, or Rush. The priority flag will be visible for any order marked as Rush, High or Normal
-
- The Priority Flag will be visible for any Rush/High priority order,
Filter Option on Order Processing Screens
-
A dedicated filter named
Order_priorityis available on all order processing screens. -
Possible values: Normal, High, or Rush.
-
Any order marked Rush or High will appear under this filter.
Please Note : If any order with Rush/High priority is available the same will be visible as an entry in the filter.Sample screenshot attached below:-
API Response
-
For API integrations, the
order_prioritykey will be present in the Get All Orders API response. -
Example:
"order_priority": 1(where 1 represents the priority status).
-
Related Articles
Integrating Ajio JIT with EasyEcom
By following the below-mentioned procedure you can easily integrate Ajio JIT with EasyEcom. Step 1: Click on the Settings⚙️icon on top the top right corner Step 2: Click on 'Add Channels' Once you click on 'Add Channels' you will be navigated to the ...Integrating Vendor Central Dropship with EasyEcom
By following the below-mentioned procedure you can easily integrate Amazon Vendor Central Dropship with EasyEcom. Step 1: On the dashboard, click on the “Three dots aka meatball menu” Step 2: Click on the “Account Settings” option Once you click on ...Integrating Ekart with EasyEcom
Overview Ekart can be integrated with EasyEcom as a shipping carrier to manage shipment creation, shipment tracking, and return processing. Once integrated, EasyEcom can create shipments in Ekart and receive shipment status updates. When to Use This ...Integrating Loqally with EasyEcom
This guide explains how to configure the Loqally integration in EasyEcom, and also supports reverse shipment. Step 1: Navigate to Carrier Master Masters > Carrier Master Step 2: Click on 'Add New' and Select 'Loqally Outbound' from the dropdown Step ...Integrating Shopee with EasyEcom
This guide explains how to connect your Shopee store with EasyEcom using the Shopee authorization flow. Prerequisites A valid Shopee seller account. Access to the Shopee account or merchant account that needs to be connected with EasyEcom. Step 1: ...