Assigning packing material to the orders
Packing material activation and assignment
Follow the below steps to assign packing material to the orders-
Step 1: Create packing material in the product master
Navigate to Masters > Product master > Create new product > simple product
Select the material type as "Packing material"
After creating the packing materials, you need to ensure that the inventory for the packing materials is available. For this, you need to do GRN.
Step 2: Turn on the settings for packing material
Go to the Account settings > Other settings > Packing material activation
You can activate packing material on any of the 3 pages (new order page, packing station, order manifest) as per your preference
Step 3: Assign the packing material to orders
1) New orders page:
I] Assigning the packing material individually to orders-
a) Choose the packing material from the below section-
You will be able to see all the packing materials in the dropdown which are created in the product master-
II] Assigning the packing material in bulk orders-
Alternatively, you can assign the packing material to all the orders in bulk by following the below process-
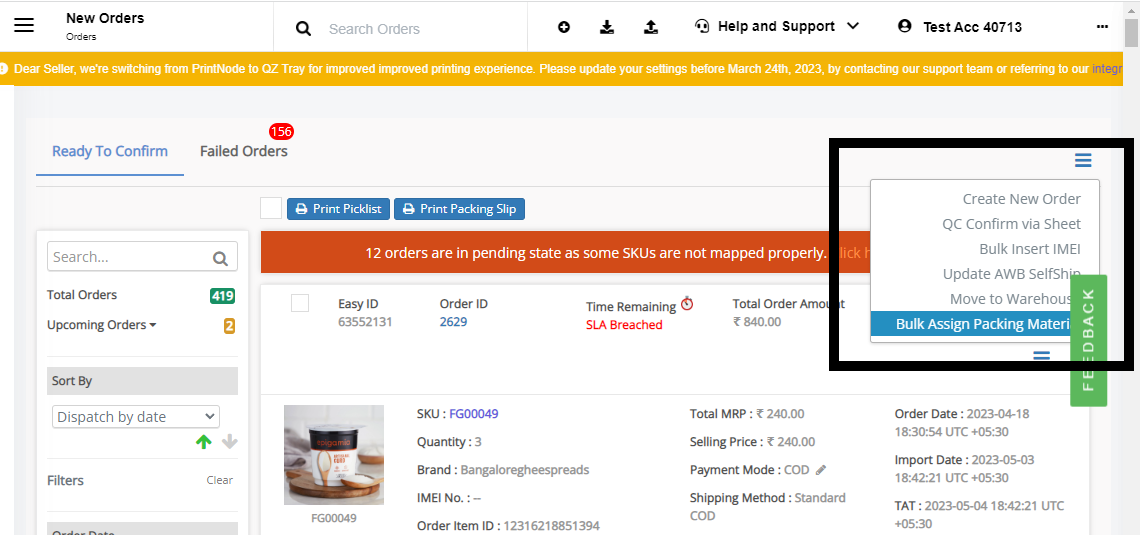
a) Go to the hamburger menu > Bulk assign packing material
b) On click of the bulk assign option, the below pop-up will appear. Download the Excel file by clicking on the download template.
For 3PL, you need to select the client-
Only those orders will get downloaded which belong to the selected client.
c) Fill in the Excel file. There is a sample data format that you can refer to on how to fill the Excel file.
Enter the packing material which you want to assign and the respective quantity in brackets (). No space should be there between the packing material and the quantity.
This sheet includes the orders from both new orders tab and failed orders tab (except the orders whose inventory is not assigned).
NOTE for bulk assignment:
- You can assign a total of 8 different packing materials in the Excel file (in 8 columns).
- Do not enter duplicate packing material in multiple columns for a single order.
- Do not enter any space between the packing material and quantity. It can be "wrap(2)" or "pack001(2)". It should not be "wrap (2)".
- You have to enter the exact name of the packing material as in the product master. If the packing material includes space, you have to enter that with the spaces. For example, if the packing material is bubble wrap 001, you have to enter the exact name along with the quantity "bubble wrap 001(3)". However, the input is not case-sensitive.
- Enter a valid quantity. The quantity cannot be zero. Even if you have to add only 1 packing material, you need to enter the quantity "pack001(1)".
- You have to enter the packing material in simultaneous columns. Suppose you want to assign 3 types of packing material to an order. You have to enter the material in 3 simultaneous columns. There should not be any gap between the packing material columns.
- Do not delete empty columns. Suppose you want to assign 2 packing materials to order. In this case, the first 2 columns will be filled and the rest 6 columns will remain blank.
- The inventory of the packing material should be available in the system otherwise it will give you an error while uploading.
d) Upload the Excel file back into the system
After uploading, the packing material will be assigned to the orders.
2) Packing station page:
Order batches > Select the batch > Start processing > Packing station
After you scan the SKU/serial, a pop-up will come up asking you to choose the packing material.
If you want to increase the quantity of the packing material, select that material again.
3) Manifest page:
Orders > Generate pickup manifest
The selected packing material will be assigned to each order/tracking number.
Related Articles
Order Batches & Packing Station for B2C orders
Software Plan: Starter, Growth & Enterprise Account Type: Seller Account, Aggregator & 3PL Inventory Type: Serialized & Non-Serialized Feature Description The packing station is where the products are checked and packed before shipping. The station ...B2C Order Processing – Individual Orders
Software Plan : All Account Type : Seller Account & Aggregator 3PL Inventory Type : Serialised and Non-Serialized Description This article documents the end-to-end processing of individual B2C orders in Easyecom, starting from order availability in ...HHT- Pick & Pack process for B2B orders
Software Plan : Starter, Growth & Enterprise Account Type : Seller Account Inventory Type : Serialized & Non-Serialized Required Settings for this feature to work : Settings to be enabled from the backend 1. is_b2b_new 1 This setting will enable the ...Scanning of Tagloops- B2C
Scanning of Tagloops On New Orders Page This video demonstrates the process of scanning Tagloops on the New Orders page under the Ready to Confirm tab if you don't wish to scan the tagloops at the packing station. It highlights how sellers can ...Shopify Tag Orders Import
Software Plan : Starter, Growth & Enterprise Account Type : Seller Account Inventory Type : Serialized & Non-Serialized Feature description With this new enhancement, users can now import order tags from Shopify directly through the EasyEcom user ...